Showing posts with label paper. Show all posts

Saturday, June 29, 2013

My heart beets for a good pun

**A quick administrative note! Just a reminder, as I'm sure you are all aware, Google Reader is shutting down on July 1st, so be sure to switch your subscriptions over to a new service.  Personally, I'm using Feedly - it has both an add-on for Firefox and a web-only version, and it has a one-click sync with Google Reader, so it will automatically import all your subscriptions and saved articles.  I think a lot of people also like Bloglovin, so you might also give that one a try if you haven't already picked a new reader.  That's all, happy reading!**

Ooh, a rare art project from me :)  I don't really do much in the way of classical art projects - I'm more crafty than artistic I guess. I made this little painting for N for his birthday this year.  We kind of have a thing about beets, we're even growing a whole trough of them!

I used a small spare piece of Bristol paper (it's like a nice cardstock) and these really cool pearlescent watercolors.  They give your illustration a nice shimmer at the right angle; I regret I couldn't really take a good picture of it.

DPP_0251

DPP_0252

Thursday, September 6, 2012

How to dress up a boring pack of $1 cards

I love beautiful handmade cards, but I find it difficult to make 8-10 of them all at once. Plus, when you're pressed for time, it's all you can do to jot down thank you notes and get them mailed off.

Here's how I dressed up a pack of cards that I picked up from Michael's dollar bins (in just 3 easy steps!):

IMG_4587
I love Melissa's modern calligraphy style, and I would have totally printed these out in a heartbeat, but alas, I am out of color ink on my printer, and I already had these in my stash.
1. Add a pretty sentiment to the front of the card.

IMG_4588
2. Just add a fancy envelope seal, also picked up in the dollar bin at Michael's.

IMG_4589
3.Add "faux-calligraphy" for the address like Melissa's and hop off to your local post office for some pretty postage stamps.  Try Centeria for your look-a-like calligraphy from dafont.com.

4. [optional] Beam stupidly at the post office lady when she admires your hand lettered letters, and tell her proudly, that, yes, you did do those all by hand.

Obviously, these still require a neat bit of handiwork, but I find that they have a nice hand made touch without having to design and make up a whole card from scratch.

Also, I love these Staedtler triplus liners, they come in a bunch of colors and have a 0.3 mm nib.  And the reason they're called triplus is that the barrel of the pen is actually a triangular prism, so no more pens rolling off the desk :)

Wednesday, February 29, 2012

Book Surgery

This is seriously amaaaazing.  It kind of blows my mind the way that he got all of these book pages to flow together so well.

Thursday, February 9, 2012

Matchbook Notebooks

 I'm forever searching for little bits of paper to jot down a note or give out my email address or some other thing.  This is the perfect solution for that.  I had a couple of paint chips left over from picking out new paint colors for my bedroom, and I also used the cover of the fall 2011 Urban Outfitters catalog.


 Another fun little thing, I colored the tops of all my staples with a green Sharpie.  It gives some color to my otherwise boring school papers sometimes.

The inside of the UO notebook that I made.  I love the pretty black and white forest scene.


The construction isn't too tedious.  I used the basic instructions found via Curbly and Capital B to make mine.  Obviously I had to change the measurements since I set mine up differently, but it's still the same basic matchbook style notebook with some pieces of printer paper cut to size.

Thursday, February 2, 2012

DIY Necklace Card


This is a super easy DIY to dress up a necklace that you plan on gifting but didn't already come in a box or bag.  In fact, this is barely a tutorial, and more of a look-what-I-made.

Materials:
cardstock
scissors
fine tip pen
tape

1. Cut a piece of cardstock appropriately sized.  I think mine was about 2x3 inches.
2. Cut slightly angled notches about 1/4 of the width in from both sides on the top.  (See the picture)
3. Determine how low the necklace will hang on the card (what length of chain is in the notches) and add your design! I picked the very popular laurel wreath/branches design that I've seen popping up all over the place these days.
4. Not shown, but cut a smaller piece of cardstock maybe 1x1 inch.  Coil up the remainder of the chain on the backside of the cardstock and place the smaller piece over the coiled chain.  Tape down.

You could even personalize this with a note (like Happy Birthday!) or to and from.

How easy was that?  Now this is perfect for putting in a flat gift card box or a pillow box.

Enjoy :)

Wednesday, February 1, 2012

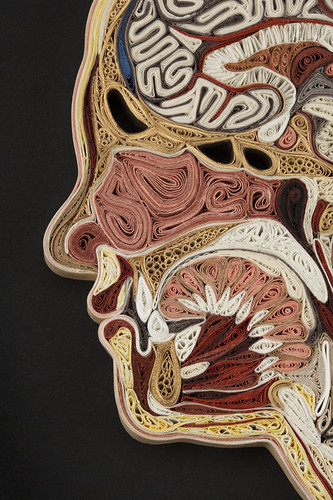
Quilled Human Anatomy


This is seriously so rad.  I'm pretty much a sucker for things that incorporate crafts and science. 

Monday, April 18, 2011

Further Experimentation in Papercrafts

It's been decided. I've become the designated thank-you-card-maker for my club. They all liked the last one so much, they decided I should make another for our speaker at the next meeting.

Now, I've always liked making my own greeting cards. I feel like handmade cards are such a nice touch. This probably stems from Girl Scout days when we had an actual Stampin' Up! party/demonstration as one of our troop meetings. Rubber stamps were the thing back then and I remember making thank you cards for all my teachers at the end of the school year. They were suitably impressed with my young crafting skills.

My crafting supplies are seriously limited with me living at school, so I make do with a few essential items. Some of the other stuff, like cardstock and paints, come from the college's art club supplies, of which I am the president :P But really, my X-acto knife is my best friend and one of the few crafting supplies I keep at my house here.

I was at a bit of a loss for inspiration when trying to make this card. I was rummaging through a box of art club supplies and found these card blanks with embossed flower pattern on the front. You could hardly tell it was embossed though. Good enough to start with, at least it wasn't from scratch. I cut out the flowers and stems with my knife, but left some spaces like between the flower and the stem to preserve some of the card's structural integrity since all of the cut out spaces were smack dab in the middle of the card. I cut out some white cardstock/art paper to fit the inside front panel (I miss my paper cutter! One of the few crafting tools I failed to bring here with me). Brushed on a nice peachy color behind the flowers and a green behind the stems, watered down for a paler color. The nice part about this is you don't have to be exact about where the color goes and so you don't get those icky "edge" lines in your painting, just a nice wash of color. I also took a fine tipped paintbrush and white paint and painted in the flower details (petal creases? stamens?) Finally, I faked my way through a calligraphy-looking "thanks" with the same fine tipped brush and white acrylic paint.

And there you have it. Not too shabby for a quick, thrown together kind of card. The cutting does get tedious though especially with the rounded shape of the petals.

And of course, I've got crafter's eye. I noticed all of the imperfections and didn't really want to give the card to the speaker because it didn't quite live up to my expectations of how I wanted it to turn out. I smudged the paint between the "a" and the "n" and there were weird glue stick residuals in random places and the cardstock wasn't the perfect size and the green wasn't dark enough in the end and I really botched up the name on the envelope (the handwriting, not the name!) and the list goes on. But it's all good.

The Details:
Pre-made card blank from Michael's
Dafont.com - Jellyka font


Lots of other WIPs to be finished soon and hopefully photographed before I send them off to be donated.

Thursday, February 24, 2011

Paper, Embroidered

I was in charge of making up a little thank you card for a guest speaker who came to one of my club's meetings. I thought I'd try a little paper embroidery...this was not a particularly good idea. For many reasons, this was much harder than expected and came out not as pretty as I'd have liked. See my faux "calligraphy" on the envelope there?


Here's how I did it:
-Pushpin to make holes since I was using a blunt-tipped needle

-Weight 4 worsted yarn, stripped down to one strand (in lieu of embroidery floss)

-Chain stitches (I believe they are called) for the loopy petals on the flowers, everything else was straight stitch.

-Dafont.com for a calligraphy-looking font to semi-copy onto the envelope. I'm fancy like that.

Here's why it almost didn't work:

-Paper tears. The small pushpin holes were made bigger by the needle and yarn going through, so the holes were quite visible. Not especially pretty.

-The yarn was finicky. I mean that from pulling the yarn repeatedly through the cardstock-weight paper, it started to pull apart itself so that it was essentially unraveling itself. It's like when you pull putty and it gets really long and skinny in the middle then breaks? Yeah, like that.

-It was a card so of course there was going to be writing on the inside. But the inside was also the ugly backside of the yarn embroidery. Solution? Some pink construction paper glued down over it to hide the backside. Why didn't it work? The yarn was so lumpy in places (from loose ends and whatnot), the paper wouldn't glue down flat. Of course, when your paper isn't flat, glue sticks refuse to stick anything together. So, the inside was unflatteringly taped down with Scotch tape.


All in all, a good product. I probably wouldn't do it again unless I was embroidering with actual floss and on cloth.

Friday, January 7, 2011

Craft: Cutout Card

Some crafty nerd love for an awesome TA that I had in an organic chemistry lab.


They're little test tubes with a letter floating at the bottom of some suspiciously psychedelic looking liquid.

Required materials:
-X-acto knife
-cardstock
-markers
-glue stick
-patience

I just cut out the bottom portions of the test tubes and pasted a colorful bit of paper on the backside to show through. I cut the card so that the letters were attached to the card itself, but I think they could be easily glued if so inclined.

I think I'll be using the same idea for a birthday card very soon...

Tuesday, October 26, 2010

Fold: Kusudama Flowers

I found this great tutorial somewhere online for these beautiful paper flowers. I have this perfect little stack of colored note papers that I use for notes and other random things (like making origami!) right next to my computer. There are some failed/half-folded things littering my desk, but surprisingly, I actually finished this one. This one is pretty simple compared to some of the more elaborate paper crafts on their site.


Process photos and full tutorial over at Folding Trees. link here.

Aren't those great, especially the ones made with patterned paper? I don't think I'd ever have the patience to finish a whole ball of them though! I'll just have to stick with the one and put a stem on it for some year round cheeriness.

I used Elmer's white school glue (which btw is pretty much the best thing ever! in my opinion of course) and bobby pins to hold the petals together while the glue dried. The glue stick slowly came apart even after it dried, so I re-pasted with the white glue. I folded all the petals at once, let them dry overnight, and then stuck all the petals together in the flower shape, glue and bobby pin, dry overnight. Pretty easy especially because I don't have a lot of time to spend crafting.