Showing posts with label tutorial. Show all posts

Monday, March 30, 2015

Claire's Itty Bitty Dress

Obviously I've been on an Itty Bitty Baby Dress sewing binge, and I'm setting new finishing records every time I sew this. This one took me just 2 hours and that was with futzing around with the cutting layout and stopping to take a bunch of process pictures.

This particular bundle is for my coworker and his wife who just had their first baby girl, Claire!
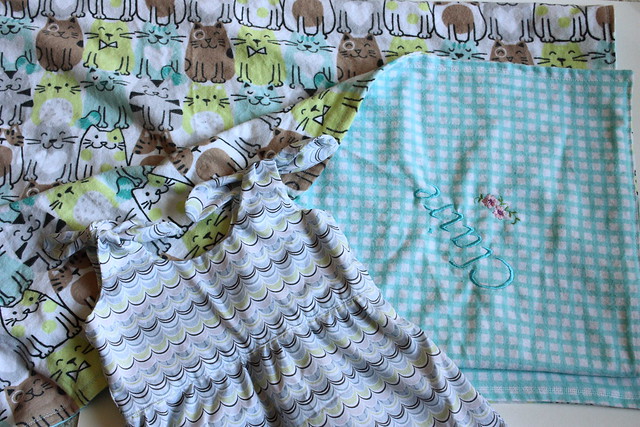
Claire's Itty Bitty Dress and Blanket

Can we talk about this flannel? How cute are those cats?? If it was remotely acceptable, I would literally own 100 simple flannel blankets with all the cute prints I keep coming across (I have, as of now, only one such blanket with adorable zebras on it that I totally swiped from my mom's stash, which was definitely earmarked for a baby.) This is a current(!) print that they are selling at JoAnn, so you can totally get some if your store has any left :)

The simple blanket is just two pieces of flannel (44" square) sewn right sides together and then flipped RS out and top stitched with a decorative stitch. I'm very fortunate to have access to my mom's fancy embroidery machine, and so I usually ask her to embroider the name of the new babe on one of the corners.

I did take step-by-step photos of putting the entire dress together from cutting to finishing (because I do love me a good hand holding photo tutorial), but I thought it might violate the spirit in which Rae shares this pattern, so I have just pulled out a couple of photos on my clean finished lining which is not covered in the original instructions.

So jumping into the middle of construction here...

Lining the Itty Bitty Baby Dress

I'm at the point here where I have attached the two bodice pieces together on one side only and attached the whole skirt piece to the bodice (I only cut one super long skirt piece instead of two). I used my go-to tutorial for making that clean side seam which I'll show more of below.

Lining the Itty Bitty Baby Dress

It's a little difficult to tell since I used the same fabric to line the bodice, but I have folded the dress right sides together and matched up the unsewn side seam.
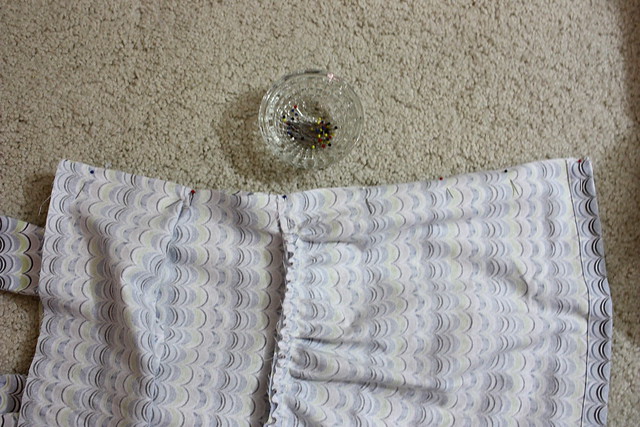
Lining the Itty Bitty Baby Dress

And then flip up the lining and sew all the way down that seam (from left to right in my picture). I like to do it this way because then I only have to finish one side seam below where the bodice is joined to the skirt as opposed to doing this twice with two side seams if you cut two skirt pieces.
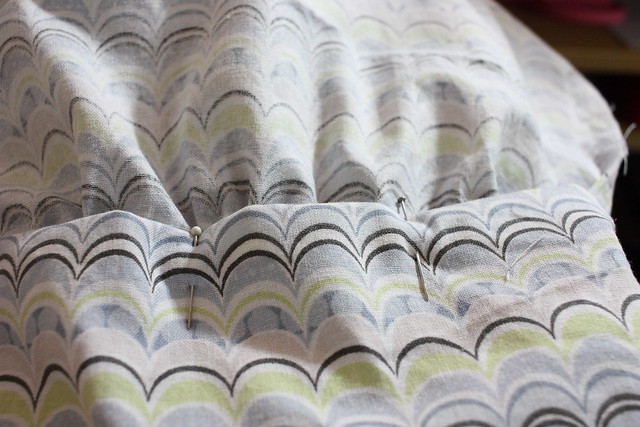
Lining the Itty Bitty Baby Dress

And the final step in my construction (because I don't use piping) is to fold under the lining and enclose the waist seam on the inside of the dress. Then, on the outside, top stitch near the edge of the waist seam taking care to catch this folded under lining on the inside.

Leave me a comment if you would like me to talk you through this in a little more detail (or if this is just plain confusing)! Happy sewing!

Thursday, July 11, 2013

Multi-Stranded Hair Elastics [A Photo Tutorial]

So I decided to expand on my little explanation tutorial from previously (my refashioned hair ties) with a few more pictures.  I'm still rocking the colorful elastics everyday, and they've been holding up pretty well.  If crazy 2/3/4 color hair ties aren't your thing, you can certainly make one with all black elastics, I have.  And I know a lot of girls actually like to hide their hair ties under a small wrapped bunch of hair, but try these out for exercising.. or something! I bike to work everyday, so a not-too-fussy ponytail is critical.

Let's dive in!

DPP_0257
If you have a lot of hair elastics that look like this, these are the perfect candidates for turning into multi-stranded hair ties.

DPP_0258
1. Cut off the stretched out portion between the ends of the elastic. (I love my new/old scissors! I got them at an estate sale lately for basically nothing, and they're still sharp!)

DPP_0259
2. Align the ends of all your hair ties and put them in a pretty color order!

DPP_0260
3. Use a binder clip to secure the ends of the elastics as arranged about half and inch from the ends as shown.  Make sure that they are all very close together.

DPP_0261
4. Sew all the ends together with a hand needle and some thread, any color is fine really.  Just go back and forth several times and in all random directions, just make sure it's secure.  I sewed through the elastic as well as the colored casing so that the elastic couldn't pull away and become stretched out again so easily.

DPP_0262
5. Secure your sewn end to a table/desk.  I used a large binder clip and then put just the very end of the elastics under the clip, just to hold in place while you braid.

DPP_0263
6. Braid! I used this fabulous tutorial for the four-stranded braid from Rock Mosaic.  You can, of course, do a regular three-stranded braid or a two-stranded twist.  Make sure it's a tight braid and go all the way to the very end of the elastics as much as possible.  Secure the end of your braid with a second binder clip and sew those ends together as well.

DPP_0264
7. With both ends sewn up, join the two ends together (be careful not to twist!) as shown and sew the two ends to each other.

DPP_0265
8. All done!  The braided elastic is much tenser than any single elastic alone.  Plus, your new colorful hair tie also doubles as a pretty bracelet when you're not wearing your hair up!

If you make one, post a picture, I'd love to see!  I like the idea that there are other people out there with fun hair elastics too :)

Thursday, May 16, 2013

Fake-torial: Split Rings

So, remember my key necklace?  I believe I promised that I would show you how lazy cheap people (like me) make charm necklaces.  As mentioned, I got some split rings, but I didn't really think it through.  I didn't realize that split rings require special pliers to get them open so that you can get your charm on.  I live far from the craft store, so it's not easy to make a quick jaunt down there for every little thing (plus I don't want to buy more tools that I'll only use once).  If you're going to be attaching lots of charms or just generally using many split rings, then by all means, use split ring pliers.  They're definitely easier, I'm sure.

Putting a single charm onto a necklace? Then let's dive right in:

201305161

1. (World's Tiniest Proposal?) Get your split ring and find where the ends of the ring are
2. Use a pair of fingernail clippers (I have a pair that I don't use because I somehow have several) and carefully "clip" between one of the ends and the ring so that the end lifts up away from the ring slightly.
3. Carefully wedge a flat tool underneath the lifted edge while still opening the ring with the clippers.
4. Wedge the tool further under so that the ring opens up more.  It has to be far enough away from the very end so that a charm can be slipped on.
Add your charm and slide it all the way around until it locks in to the middle of the ring, just like putting a key on a key ring.

Done!

Maybe this was slightly harder, especially if your fine motor skills aren't up to snuff, but it was cheaper, right?

Who's with me on this?  Anyone else grappled with split rings before?

Thursday, January 24, 2013

Refashioned Hair Ties

So, I have very thick, long hair. I know, what a tragedy.  Well, it's a tragedy for my hair rubber bands because they tend to get severely stretched out after a short while, but I can't bear to throw them out.  Because I'm cheap.  But we all knew that. I usually buy my elastics in bulk in LA, so they come in weird colors if you don't get the all-black set.

So I devised a way to extend the life of my hair ties while also creating fun little things for my hair which I usually wear in a ponytail to work.

I like this little method because I usually will wrap a single rubber band 3 times around my ponytail to secure it, but with the doubled up elastic, I only need 2 wraps to secure it.

I have little names for them, is that weird?
Rainbow Sherbet (left),  Hot Topic (middle), Winter Wonderland (right)

 
DPP_0199

Here's the how-to: (which is more like just explaining my process.  Go ahead and get crazy with it)

-Cut apart your old, stretched out rubber bands so that you have one long piece.
-Use a binder clip to secure multiple bands together at the same length and hand sew them together as if you were starting a friendship bracelet.
-Braid your 3 strands together or twist 2 together (like the pink and black in the middle of my photo).
-Use another binder clip to keep the braid intact and sew together the ends of the bands.
-Bring your two ends together to reform your elastic and sew the elastic shut so that it looks like one continuous loop (so sew the elastics end-to-end not side-to-side).
-And you're done! Rock that pony!

Tuesday, January 15, 2013

Veggie-tastic Crochet Case

I've been wanting to make a cute little crochet case for N for a while. Personally, I use an old Lisa Frank stationery binder to hold my hooks and various crochet odds and ends. 

If your new year's resolution is to crochet more, maybe this cute case will inspire you to take your crocheting with you everywhere.

Sorry I didn't take process photos, but I kind of winged it as I went, so I'll just explain my process.  Honestly, the whole thing is just sewing felt shapes to another big piece of felt.

I have a carrot scissors holder, eggplant safety pin tab, bell pepper needle holder, and beet hook slots.  These are all vegetables that we actually grew in our garden. 

I think other vegetables that would be cute here are mushrooms, ears of corn, peas in a pod, green onions, and tomatoes. Just try to pick vegetables that translate easily to graphic line drawings (for example, not round yellow onions because the shading and skin would be hard to convey with felt),

See the how-to below:
DPP_0193

Materials:
-2 full sheets of felt (any color) in standard 8.5x11"(?) size bought at Michaels
-Various scraps of colored felts for veggies
-2 Buttons and elastic or 2 pieces of ribbon
-Flat plastic sheets, I used part of the top of a sandwich party platter plus two pieces from a plastic school folder

All the pieces will be sewn onto the inner piece of felt and then the cover will be added with the plastic for stiffness.

1. Trim your inner felt piece so that it's a little smaller than your outer piece so that it will fold nicely.

2. Cut out all your shapes from various colored felts and make sure that they fit onto your inner piece.  The carrot should be big enough to cover most of the scissors but with the handles peeking out (see picture below)

3.  Do all the embroidery and top stitching of details before you sew anything down onto the inner piece of felt.

4. Working from left to right on my case, start with the carrot.  Sew down the greens first with an extra strip of green (with a buttonhole!) tacked to the bottom of the foliage.  Sew your button onto the carrot then sew the bottom v-edge of the carrot but not across the rounded top!  Gotta leave room to put the scissors in.

5. Bell pepper next. Sew down 2 strips of felt across the top of the bell pepper leaving spaces for needles to go through.  Sew around the outline of the pepper and its stem.

6. Eggplant. I actually hand stitched the eggplant because much less of it is tacked down to the felt to leave room for it to be lifted up to get safety pins in and out.  I sewed around the outside of the foliage and the outline of the eggplant down about an inch and then straight across to the other side. You will end up with a trapezoid-like shape of seams on the top of the eggplant.
DPP_0194

7. Beets! Sew down the greenery. Add a strip of beet color in the middle of the greenery and sew up the sides but not the top and bottom (the hook is going in there).  Finally, sew the beets on top and position so they are just barely covering the bottom of the greens.  Sew around the bottom of the beets and leave the top open so that the hooks will poke through (I top stitched the beets before hand to make them look more complete).
DPP_0195

8. Sew the little hot pepper onto the cover piece of felt.  Place and sew the button on.

9. Add the front cover! Sew a seam down the middle of the case for a center seam.  Carefully sew around the edges leaving the top open.  On the back side seam, tie your elastic into a loop and push the knot between the cover and inner felt pieces even with where the button is on the front.  Stitch over the elastic while doing the seam. Instead of elastic and button, you could use 2 pieces of ribbon for a tie closure.
DPP_0192

10. Adding the plastic.  Cut your plastic sheets to fit the front and back of the case and slip them in between the cover and inner felt pieces.  For the back piece of plastic, I used the top plastic cover from a sandwich party platter and cut it to size.  For the front, I used a beat up plastic file folder and cut 2 of the same size since they were a little flimsier than the sandwich tray.  Sew a seam across the entire top of the case to encase the plastic and sew the pieces of felt together.

Fin!  Now you have your own veggie-tastic crochet case to take your crocheting on the go - in style!

If you have any questions, feel free to leave a comment, I know there are a lot of words and not that many pictures, so ask away!

Thursday, January 10, 2013

Rosemary Wreath Present Topper

I love prettily wrapped presents.  It's also like how I love making beautiful cards but then have nothing to write inside of them, haha!  I'm usually super cheap about things, so I oftentimes wrap things in brown paper bags from the grocery store.

I had this brown cardboard box from the 85 degree bakery in Irvine that was perfect for wrapping up a shirt.

I loved this idea from Crafts Unleashed via Craftgawker.  I have limited access to craft stores in my area, so I didn't want to go out and buy wreath forms.  I opted to make the whole wreath out of rosemary since it grows wildly abundant here in SD.  Beware, working with the rosemary does make your hands pretty sticky.  But it smells so lovely :)

DPP_0197


The close up!
DPP_0198

I just used 3 woodier sprigs of rosemary and made them into a roughly triangle/circle shape and used wire to bind the stems together.  Then, I added sprigs on top of the round to make the whole thing fuller and tied them on with a little bit of white thread where needed.  I made a big red bow out of felt (here's a good little picture tutorial) and then tied the wreath to the package.  Ta da!

Thursday, September 6, 2012

How to dress up a boring pack of $1 cards

I love beautiful handmade cards, but I find it difficult to make 8-10 of them all at once. Plus, when you're pressed for time, it's all you can do to jot down thank you notes and get them mailed off.

Here's how I dressed up a pack of cards that I picked up from Michael's dollar bins (in just 3 easy steps!):

IMG_4587
I love Melissa's modern calligraphy style, and I would have totally printed these out in a heartbeat, but alas, I am out of color ink on my printer, and I already had these in my stash.
1. Add a pretty sentiment to the front of the card.

IMG_4588
2. Just add a fancy envelope seal, also picked up in the dollar bin at Michael's.

IMG_4589
3.Add "faux-calligraphy" for the address like Melissa's and hop off to your local post office for some pretty postage stamps.  Try Centeria for your look-a-like calligraphy from dafont.com.

4. [optional] Beam stupidly at the post office lady when she admires your hand lettered letters, and tell her proudly, that, yes, you did do those all by hand.

Obviously, these still require a neat bit of handiwork, but I find that they have a nice hand made touch without having to design and make up a whole card from scratch.

Also, I love these Staedtler triplus liners, they come in a bunch of colors and have a 0.3 mm nib.  And the reason they're called triplus is that the barrel of the pen is actually a triangular prism, so no more pens rolling off the desk :)

Thursday, August 30, 2012

Running Mate Key Minder

I am very minimalist when I run.  Nothing in my pockets and my ipod, when I have it, is usually clipped onto my shorts so nothing is really bouncing around (or can bounce right out of my pocket). 

DPP_0133
I used to have one of these that I think I picked up at a 5K as a freebie from Reebok, but I lost it and can't seem to find a replacement or anything similar.


DPP_0134


DPP_0135
The supplies:
-A scrap (<0 .125=".125" cloth="cloth" duck="duck" nylon="nylon" of="of" something="something" sport="sport" sturdy="sturdy" yds="yds">
-Velcro aka Hook and Loop closure in generic brand
-Twill tape/grosgrain ribbon/bias tape

I made a pattern! Please excuse the roughness of it as I am neither an artist nor a seamstress.  Everything I know about sewing is pretty much based off of my middle school home economics experience.

Download from Flickr and print! I believe it's the Large 1024 size that gives the right pattern size as long as you don't fit/scale it to the page when you print. Cut on the outside of the thick black line (pattern piece on the left).
IMG_0013

1) Cut out 2 pieces from your fabric.  You will only work with one of the pieces until step 5.

2) Make a self fabric tube, about 1.5 times the length of the middle portion of the pattern piece.  Fold a strip of fabric in half and sewing up one edge and turning inside out, placing the seam in the middle of one side, then hem the short edges of the tube by folding over twice.  Sew a rectangle of Velcro onto one end of the tube as long as the top piece of the pattern plus an extra 1/2-1 inch.  Stitch on in box shape as shown.

3) Sew on the other side of the Velcro on the top edge and bottom edge as shown.

4) Sew on the other end of your fabric tube (opposite end of the Velcro end) to the box indicated at the bottom fold.  Wrong side of tube (side with seam) should be facing right side of piece.

5) Now, sew together 2 pieces of pattern wrong sides together.

6) Take your twill tape and bind very bottom edge (thick edge in drawing) to enclose raw edges.

7) Fold up at bottom fold and add binding to all edges.

Hopefully those instructions are fairly clear!  Please post a picture if you make one :)

To use:
Unlatch Velcro and feed self fabric tube through laces of shoe.  Velcro to top flap, insert keys/money and latch Velcro to bottom flap.  Go run :)


Thursday, August 16, 2012

Breaking Glass

We did the increasingly popular DIY of cutting wine bottles with acetone on our day off way back on Fourth of July.  I first saw it on Lifehacker before it blew up all over Pinterest and all the other crafting sites.  And here's another tutorial from Lifehacker on cutting up bottles with a cleaner edge (the acetone method leaves it pretty jagged).

IMG_4493


IMG_4497


IMG_4498Haha, we thought this was really funny.  We thought this looked a little like the wine bottles had weirdly sunk into the patio.

IMG_4595

And here's the finished product! We put together 3 of our cut bottles and glued them together using glass and ceramic cement.  Awesome utensil holder!  And it really cleared up the clutter in the cabinet.


(Woops! Would you believe I hit my photo limit in the built in Blogger web album?  I'm going to try and figure out the Flickr thing, hopefully all of the photos will stay visible on my free account.)

Thursday, February 23, 2012

Don't break the chain.

 Lifehacker is so useful.  This particular article popped up on my Recommended Items in Google Reader.  I'm using this idea to help me self-motivate to study for my impending doom, ahem, I mean MCAT exam.  See the details here and here (both at Lifehacker).


I've always had a problem with procrastination mostly because it's a vicious cycle.  I have found, in the past, that I'm usually just fine doing things just before they need to be done.  That reinforces the idea that I can slack off until the last minute.  I can't do this here.  The best thing about this productivity hack is that it is totally customizable.  This is usually a year-long thing, but I only really needed it for the following 80 days, and it converts really well to that.  Plus, you can set how much time you want to spend on your activity of choice or you can have multiple calendars for multiple activities that you want to accomplish everyday, like if I were to add exercise, I could print up a separate calendar for that.  As is, my calendar is pretty innocuous so I can add the X's directly to it.

I roughly calculated how many hours I need to study to be successful on the exam and divided that by the number of days remaining until my exam minus vacation days.  I allotted myself a prorated 4 days of vacation as based on a typical 3 weeks of vacation for a year so 4 days of vacation for 80 days (~5.75% of your total time).

And having it just above my computer ensures that I am looking at the thing constantly.

[I hand lettered the words following Brannboll on dafont as a base]

Sunday, February 12, 2012

'Orange' you glad we're valentines?

 At work, we're doing an elementary school-style valentine exchange.  Everyone is getting a little something for everyone else.  I came up with this cute, if somewhat elaborate, sight gag.

I bought a 5 lb. box of Cutie mandarin oranges and devised this little fruit cozy to put on them since I figured taped cards might fall off.  Plus, I think people will enjoy a bit of fruit during the deluge of sweets on Valentine's Day.  All in all, each little orange cost me less than 30 cents to put together, and it's a lot more thoughtful than a store bought card.


And here's the pattern that I made up for these.

With orange:
Rnd 1: Ch 5, sl st to form a ring.
Rnd 2: Ch 3, [DC, Ch2] repeat x6 (into ring). Finish with a sl st to the top of the Ch 3.
Rnd 3: Ch 3, [DC, Ch2, DC] into DC of previous round.  [Ch3, group] repeat x6 (group is DC,Ch2,DC)
Rnd 4: Ch 3, [DC into Ch2-sp. Ch 2. DC into Ch3-sp. Ch 2.] repeat around. Finish with a sl st to top of Ch 3.
Rnd 5: Ch 3, [DC2TOG, Ch3] repeat x6
F/O

With green: (leaf)
Ch 5
sl st in 2nd ch from hook, SC, SC, 4 HDC in last ch.
On other side, SC, SC, sl st.
F/O

Slip in your fruit and use a bit of yarn to loosely weave in the last round to be used as a drawstring.  Before tying a bow in your drawstring, make a little tag and slip that onto the yarn. 

Enjoy :)

Thursday, February 9, 2012

Matchbook Notebooks

 I'm forever searching for little bits of paper to jot down a note or give out my email address or some other thing.  This is the perfect solution for that.  I had a couple of paint chips left over from picking out new paint colors for my bedroom, and I also used the cover of the fall 2011 Urban Outfitters catalog.


 Another fun little thing, I colored the tops of all my staples with a green Sharpie.  It gives some color to my otherwise boring school papers sometimes.

The inside of the UO notebook that I made.  I love the pretty black and white forest scene.


The construction isn't too tedious.  I used the basic instructions found via Curbly and Capital B to make mine.  Obviously I had to change the measurements since I set mine up differently, but it's still the same basic matchbook style notebook with some pieces of printer paper cut to size.

Thursday, February 2, 2012

DIY Necklace Card


This is a super easy DIY to dress up a necklace that you plan on gifting but didn't already come in a box or bag.  In fact, this is barely a tutorial, and more of a look-what-I-made.

Materials:
cardstock
scissors
fine tip pen
tape

1. Cut a piece of cardstock appropriately sized.  I think mine was about 2x3 inches.
2. Cut slightly angled notches about 1/4 of the width in from both sides on the top.  (See the picture)
3. Determine how low the necklace will hang on the card (what length of chain is in the notches) and add your design! I picked the very popular laurel wreath/branches design that I've seen popping up all over the place these days.
4. Not shown, but cut a smaller piece of cardstock maybe 1x1 inch.  Coil up the remainder of the chain on the backside of the cardstock and place the smaller piece over the coiled chain.  Tape down.

You could even personalize this with a note (like Happy Birthday!) or to and from.

How easy was that?  Now this is perfect for putting in a flat gift card box or a pillow box.

Enjoy :)

Thursday, October 27, 2011

It's a dead man's party

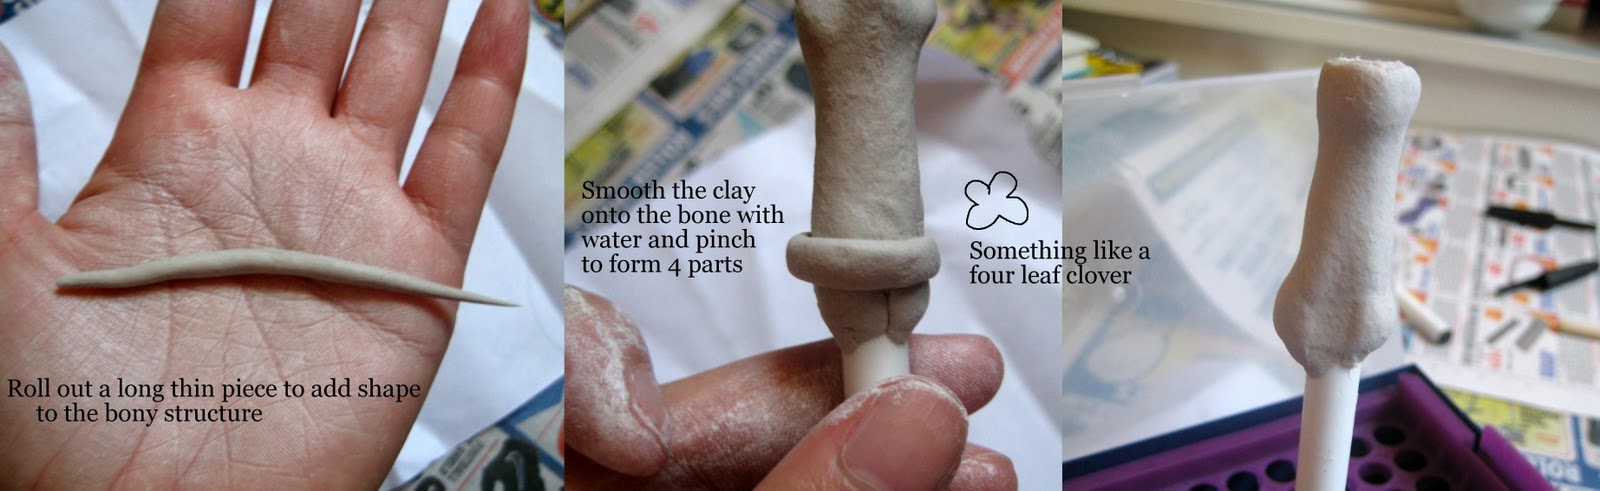
 I made this sweet phalanx bone (a fancy science term for 'finger') pen with just a little bit of air dry modeling clay and a cheap stick pen.

Here's what you'll need:
-Air drying modeling clay
-A couple cheap stick pens with detachable tips that the ink cartridges can be replaced (mostly so you can get the most life out of the bone pen :]
-Optional: paintbrush and white paint
-Newspaper to cover your work surface


[On the second pen I did, I figured out it was easier to sandpaper the surface of the barrel of the pen first so that the clay stuck better.  Of course, I didn't actually have sandpaper available, so I just scratched the heck out of the surface with the edge of a bottle cap which seemed to do the trick just fine.]


Wrap the layer of clay around the barrel of your pen at the base nearest where the tip of the pen would go.  Be careful not to go over this edge or else the pen tip and cartridge won't go back on the pen.


Repeat this process for 3 sections of bone (or however long your pen is).

 
Ta da! A fabulous pen that may (or may not) freak out any coworkers :]  Enjoy your little bit of Halloween spirit.


And, a funny outtake from this project.  I saran-wrapped the side of my camera so that I could photograph the steps with clay-covered fingers.

Thursday, September 15, 2011

What's in a name? that which we call a rose/ By any other name would smell as sweet

I've collected a massive amount of tutorials on making fabric flowers (of all different kinds), and I'm pretty sure I've made a very small fraction of these.  They're overwhelming my bookmarks!

How to make roses from crepe paper.  I've also seen this done with paper straw wrappers and the rose is left on top of the straw, super cute!


Burdastyle via etsy
Same idea as above but with nice ribbon and requiring a tiny bit of sewing.
This particular tutorial provides a nice template so you're not just cutting out wonky shapes and hoping it ends up looking like flowers when you sew it all together.

Fantastic step by step pictures and a template to work from.

A fairly simple step by step tutorial for making the round circle flowers that seem to have sprung up in every clothing store this season.

Suzannah made her own wedding dress, isn't that amazing?!  And she made all the pretty flowers that decorated her dress.