Monday, March 28, 2016

2 - Newborn Swirl Hat

Newborn Swirl Hat | Is As If

Ravelry Links -- Pattern: Swirl Hat | Project Page

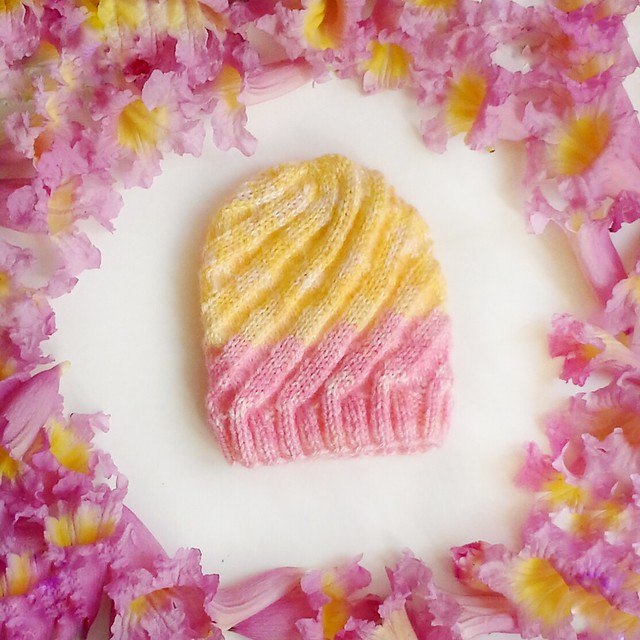
Can I just say how much I love how this picture turned out? Finishing this project coincided perfectly with all the trees going into bloom around here, especially these perfect pink and yellow ones.

Oh yeah, and the hat is pretty adorable too ;)

I've had this pattern downloaded since February 2012!! This was way before I ever started knitting! I actually think I must have gotten it off Ravelry in the idea that I would either try to replicate it in crochet or learn to knit since it looked easy. It's multi-sized so it's a great hat for literally everyone. I made the newborn size and it looks so teeny tiny! It is pretty stretchy though.

After finishing my socks (which were a disaster and a half - I'll have to take pictures and write up a whole thing about them), I was left with this little tiny bit of yarn, and a baby hat seemed like it was the perfect way to use it up. Of course I do actually have a second ball of this yarn, but I just didn't want this little partial floating around. It's an acrylic/nylon blend, very soft, but not something I'd want to knit more things for myself out of.

I was inspired to knit baby hats due to Katrina's YarnThirty podcast in which she talks about her own experience. If you're interested in the personal anecdote of someone who has had a baby in the NICU, listen to this part of Katrina's podcast (should be cued up to ~35 minutes when she talks about it). And in a follow-up comment on the Ravelry discussion board, someone else mentioned a couple of interesting points:

[And I did a lot of research on it and found that you should use very low/no animal fiber content yarns due to sensitive skin ... and found that many NICUs needs bigger size baby hats because they receive many preemie hats.]

This yarn was perfect for just such a thing: soft, washable, and cheery colors. I predict I will likely use that second ball to make lots more baby hats in different patterns :)

Another hat down! If I just made baby hats, I'd probably have 500 hats in no time!

Sunday, March 13, 2016

Black and Gold

BlackandGoldDress

As I mentioned a while back, a friend of mine got married last last November, and I made these lovebirds for the bridal shower. I also made a dress to wear to the wedding since I didn't have anything that seemed wholly appropriate for a fall wedding.

They got married at a really beautiful estate in Temecula, CA, there were even peacocks wandering the grounds!

There was even this really neat hedge maze that you could run around in!

BlackandGoldDress

Here's the pattern I used for the dress - a vintage pattern from an estate sale although now reprinted. As you can see, it's got a faux wrap style that I liked a lot just from looking at the illustration.

Butterick6582


Details:
Pattern: Butterick 6582, view C
Size: Cut out a 12 but graded down to about an 8? Obviously I didn't quite realize about Big 4 design ease when I found the pattern so I did think a 12 had a chance of fitting.
Fabric: 2 yards of black and gold-flecked crinkle-texture polyester charmeuse from Yardage Town, 2 yards of black poly posh lining from JoAnn
Notions: 22" black invisible zipper
Size Alterations: I "graded" down to maybe about an 8, but all that really means is that I eyeballed about 5/8" - 1" in from the edge of the pattern where appropriate
Design Changes: "Drafted" a full lining instead of facings, side zipper changed to CB zipper
Techniques used: Clean finish lining, installing an invisible zipper
Construction Notes: Once again working on the clean finish method, so only sort of following the pattern instructions. Hand sewed the lining to the zipper once it was installed in the fashion fabric because I still can't figure that shit out (I will probably keep this comment in all my construction notes until the end of time because do not understand).
Will you make it again? I don't know. Initially, I was pretty jazzed about how this turned out, but after some examination of the pictures/pattern, I don't think I did this pattern justice. Which means maybe I should revisit it. The bodice is supposed to be a faux-wrap style but not surplice. I have severely over-fit the bodice to the point where I've removed all the illusion that is supposed to look like a wrap. I am still loving the pattern illustration with the wide neckline and high wrap style, so I may try again in some kind of drapey but casual fabric, but change it so that weird little triangle on the left shoulder is a fully wrapped bodice?
Final thoughts: I think having re-examined it for fit, it's not great, but I loved it then and I'm certainly not ashamed of it as it is approximately the third garment I ever made.

Wednesday, March 9, 2016

1 - Ombre Calzetta

OmbreCalzetta

Ravelry Links -- Pattern: Calzetta | Pattern: Ombre Slouch Hat | Project Page

In pursuit of my knitting goals, I decided I definitely needed to learn stranded color work, aka fair isle because there are so many pretty patterns out there I want to knit!

I was given a skein of Red Heart Grande (80% acrylic/20% wool) which is a super super bulky yarn. Perhaps one of the chunkiest yarns I have ever seen. A chunky easy stranded color work project seemed like a good way to use up this random yarn. I used Calzetta as the actual pattern for the hat and applied the color chart from ombre slouch hat. Fortunately, I had some nicely coordinating yarn already in my stash to use for the main color.

A couple things that I learned from this project:
-I need to do a better job on the ribbing. It has no recovery so just stays majorly stretched out, but the whole hat is stiff enough to stay on the head I think.
-The stranded work was actually not too hard to do, but I did majorly get the skeins tangled up with each other. I think I might be able to solve that problem using a yarn guide. I can't knit English/throwing so I can't do the one color each hand that some people can do. It's supposed to be easier to knit fair isle continental, so I'm hoping that holds true for me too.
-Also, you can see that I wasn't able to work the full chart, and that I probably should have started earlier too, but I thought I was supposed to work 5" from the ribbing not 5" from the cast on edge, so I had to start decreasing much earlier than I expected.
-On that note, I probably should have given up working the chart on the decreases as they have ended up a little muddied. But I couldn't shake the idea that I wanted a full transition to the second color on the top.
-And unrelated to this specific pattern, but nonetheless about this hat: pompoms turn out bigger than you think! Clearly I have gone way off the deep end with this softball sized pompom, but it's still kind of fun :) I made my own cardboard pompom maker using this DIY (also good for making shapes inside pompoms).

 Cheers to Hat #1 of the 500 Hats Project! Onward!