Wednesday, December 10, 2014

Everyday Cloth Napkins

Everyday cloth napkins

We used to use a lot of paper napkins and paper towels when we ate our meals, and it seemed so wasteful to throw away so much paper that didn't even get that dirty. (I like to think we're pretty clean.) We finally decided to take the plunge and go the cloth napkin route, but we still use paper towels in the kitchen because eww no - I can't even imagine "reusable" kitchen rags let alone cloth diapering *shudder*.

We went and picked out several cute quilting cottons (100% cottons seem to be the best and cheapest for the job), and I bought 1/2 yard of each. 1/2 yard = 2 napkins. At first I tried to do a general color scheme, but I quit that real fast so now I can indulge my whimsical erratic style with whatever fabric strikes my fancy. Also, it's fun to pick out stuff from the red tag clearance section when it's an additional half off.

I'm sure there are many tutorials out there on how to do this, but I liked this one by Pretty Prudent the best. I cut my squares into 18"x18" (because 1/2 yard = 18", but of course you could always get a 22" cut and squeeze out exactly 2 napkins from 42" fabric). I then pressed ~1/4"-1/2" hem and again - just eyeballed it, no need to measure.

Mitered corners

Ahh, a beautiful mitered corner! Tip: If you're going to make several of these at a time, do it assembly line style, and do all the marking, then all the corner seams, then the final hem. It goes pretty fast this way! I've already made four more napkins since I took these pictures!

It's so much fun to have these pretty and colorful napkins at the dinner table. We like to pick out which ones "go best" with the overall feeling of the meal, is that totally weird?

And while we're being totally honest, we like to wash these after several uses, they're just not that dirty after a single use. What's the consensus on this one? (If you use cloth napkins) Do you wash them every time or are you ok with just throwing them in the laundry when the load has a little extra room? Chime in and let me know if you agree or think I'm a dirty dirty slob! :)

Wednesday, October 29, 2014

Reusable Shopping Bag

I've been flexing my sewing muscles lately by making a new grocery bag! Our old bag was a freebie I got at work and was at the point of disintegrating (and butt ugly to boot!). I forget exactly who said it, but life is too short to be carrying ugly bags! It was the kick in the pants that I needed to whip up this shiny new bag.

I found this beautiful printed canvas at Hobby Lobby, and I couldn't leave without it, but since I didn't have a project in mind for it, I bought a measly quarter yard and figured I'd whip up a basic tote bag or something.

Fortunately, after a little scrolling through Pinterest, I discovered this genius tutorial from Terry Ann for a sweet new shopping bag with the front and back as one whole piece so you don't ever have to worry about the bottom collapsing and falling out under the strain of too many groceries!

Since I'd only bought a quarter yard of the printed canvas, I also picked up slightly less than a yard (end of bolt!) of navy duck canvas from JoAnn. It matches pretty well to the navy in the printed pattern I think! It's wonderfully sturdy and gives the bag a nice solid structured feeling, y'know, for lugging your gallon of iced tea home from the store.

ReusableBag1

I followed her tutorial as written and just overlaid my printed fabric over the canvas and stitched my handles so that they covered the raw edges of the fabric (my handles are set a little wider than stated for just this reason). I stitched my handles on with a box x stitch for extra strength - not sure how true this is, but it is my impression that it is a parachuting standard for making sure the seam does not come apart.

ReusableBag2

Terry Ann calls for home decor weight fabric, and of course her pleat is so nicely pressed, but I could not get mine to lay flat at all, so it is what it is. I actually finger pressed everything where she calls for an iron because this fabric actually held a crease pretty well from me just smashing the fabric into a fold - bonus, no burnt fingers from the iron!

ReusableBag3

This bag can hold just a ton of stuff, volume and weight-wise, so it's a really great shopping bag!

I used the plastic piece from the old shopping bag to give the bottom a little bit of shape, but my other go-to for stiff plastic for stabilizing is plastic canvas for cross-stitching. It's super cheap and easy to find, I got mine from Michael's, and really, where else are you going to find a big piece of stiff plastic?

I feel like it's so easy to buy those 99 cent bags at pretty much every store, and they're always made out of that flimsy material. And I'm not knocking it, it's better those than plastic bags (California bag ban ring a bell?) but why not have something sturdier and prettier? So, anyone else making their own reusable shopping bags?

Wednesday, August 6, 2014

A Crocheted Boutonnière

So I had sometime ago thought about what to get my brother for his birthday seeing as I have little idea about what he might like/want (I got him a comb, lol).  I had always thought it would be really cool to do an entire bouquet of crocheted flowers, I even tried to copy this Saipua arrangement once upon a time (I love their aesthetic), but it didn't really come together.

I thought it might be time to give that idea another go, and I thought I could make my brother a cool boutonniere for his prom. Since it's pretty customary for the guy to get a tie/bow tie to match his date's dress, I didn't want to sew him a tie or bow tie because I had no idea the color of the dress.  I tried to play it safe with a black and white color scheme.

Because I went with black and white, I picked anemones as my main flower since I love those and searched around on Pinterest until I found something that I liked. (See also picture below right)

20140730

What do you think? Did I get it right?

Some details about the construction:
-I used a pair of super strong neodymium magnets to keep it in place on the lapel, no awkward pins, hooray!
-I made up the pattern for the flower and the fern as I went, but it's just a basic round shape flattened and sewed together. I think it has a total of 6 petals.
-I used worsted yarn for the fern and bobbly things, crochet thread in white for the petals, embroidery floss in black for the center, and black sewing thread to make the fringe.  I wrapped the whole thing in a scrap of white cotton with black flecked dots to continue the black and white theme (plus the stems were a little hideous)

052
I made the boyfriend get all dressed up on the upper half and stand outside patiently so I could stand on a chair and take close up pictures of his lapel :)

I think this would work really well for a wedding too! Plus it's super reusable :)

Anyone else ever try to recreate things from Pinterest?

Wednesday, July 23, 2014

A Freshly Minted Sweater

You guys, I knitted a sweater! It started out with a false start, then got a little rocky, but the big reveal is below. (Spoiler! It's totally wearable!)

I totally blame all the talented knitters on Kollabora giving me serious knit lust. But you can see that I've only made knit scarves before and only with two patterns (I made the Vite cowl 3 times and the ruffle scarf 3 times).  So, I thought I would start my sweater knitting journey off simply with a piece that was knitted flat and seamed up.

I used the Corrugated Asymmetrical V-neck sweater pattern from Teva Durham's Loop-d-loop book which I had bought on a lark at a used book store, only 75 cents! It only has 2 pieces and 4 seams, and there's nothing much crazier than knits and purls.

You guys, I'm scared of cables, but at the same time I am totally infatuated with cabled sweater patterns. Somebody teach me! (I want to make this Severus pullover so bad in that awesome jade green colorway. And also Neville's sweater when I learn colorwork.  My knitting eyes are obviously way bigger than my stomach. Also Harry Potter, ahh!)

I had this pound of love acrylic yarn in this minty green, and I figured this was the most yardage of anything I have, it'll be perfect for making my first sweater since it might be an unmitigated disaster.  I only have one set of needles, and I wanted to use this yarn, so I basically fudged the gauge and called it close enough with stretching.  I wanted it to be somewhat tighter than the picture anyways.

I cast on twice as many as the smallest adult size thinking I could match gauge by adding more stitches. But I learned, that's not how you do it, and the piece I started with was not what I thought it was. I basically had the idea that I was knitting from the waist up.  I knitted a few rows before I realized something crazy was going on and then I ripped it out and started again.

So when I started, it looked like this (see below). And I was thinking, there's no way this is going to be right. It looks like a uterus. This is after I ripped out the first try. This is actually one of the sides of the sweater, you turn it sideways when you seam it together with the other piece.  I actually had started knitting the sleeve flat in this picture.

IMG_0150

I also learned that I have freakish hulk arms and that I should probably size up in the sleeve or not decrease so dramatically.  The first sleeve I made was according to the pattern and it was comically tight and stretched out on my arm.  I debated making another but figured it would be more wearable if I did, so I scrapped the first one.

But here it is after all the trouble!  I shamelessly copied Kendi's styling with this mint and navy combo.  It's so brilliant together though, right? Totally fresher than mint and black which is what I would have defaulted to.

DPP_0421

The jasmine blooms for about a week in the course of an entire year and then all the pretty blossoms promptly turn brown and fall off.  I tried to get these pictures in before they all started dying because that bush is pretty marvelous if just for that one week.

DPP_0424

I actually nixed the corrugated pattern on the sleeves since I thought they looked kind of frumpy and opted for stockinette all the way down and then used a modified rib knit for the cuff. I thought it would be fun to have a nonstandard cuff so I finally settled on [K1, P1, K1, P3] repeat around the cuff.

20140723

I think it ended up a little short (and tight!), so it's more of a cropped sweater.

DPP_0423

Totally learned and practiced my JSSBO (Jeny's Surprisingly Stretchy Bind Off) on the cuffs! I made the mistake of using a traditional bind off on the first extremely tight sleeve, and it was all I could do to get it over my hand.

DPP_0426

Strappy dresses/tops only under this thing I guess since the neckline is so weird.  It's definitely a cool effect though.

I have no idea how much yardage I ended up using, but there is still a comically large ball of yarn left even though I was convinced I was going to use up much more than I did.

Not bad for my first try, eh? I still have yet to wear this out anywhere (do I dare?) but it's been quite hot, so that's my excuse.  I actually have a second sweater in the works right now, and it's already looking much better than this one!

Wednesday, July 16, 2014

Crochetvies

That's pronounced cro-SHAY-vees.

Crochet + cavies = crochetvies!

Look at those sweet furry and yarny faces! 

IMG_1846
Pumpkin!

IMG_1835
Sage!

They're my furriest inspirations :)

Anyone else doing some pet related crafting?

Monday, July 14, 2014

A little bit of crafting, a lot of sewing, and no blogging

My apologies to anyone still out there.. sorry I've been so lackluster around these parts!

But it's hard work keeping up the blog. For the most part, I've been doing a lot of uninteresting things, with the exception of a few big events. However, it's hard to set aside time to put together a blog post when that time could be spent frustratingly enjoyably sewing. Plus, I'm a little camera shy, and a lot of my recent makes involve me gussying myself up and preening for the camera (in a preferably picturesque locale). You can see why I don't do this.

Funnily enough, my friend just posted about blogging procrastination. It's a much funnier version of what this post essentially says (TL;DR Sorry I suck at blogging). Go check it out, she's a very funny lady.

I thought I would just share this little phone snapshot of a bit of embroidery work that I did on some lab coats for work. The university provides us with lab coats with personalized embroidery but there's a turn around time of at least 6 weeks. And it didn't work out with a student worker, so we got these two with his name even though he'd been long gone. I took the liberty of unpicking/cutting off the embroidery and going over it with a little bit of hand embroidery of my own to hide the many pin holes left behind by the previous name.

20140710_174513

I'm hoping to up my blogging game in the coming months since I'm going to try and do Sally's summer stash-bust challenge. I've already technically finished a piece after June 21, but sadly I have no pictures to do it justice. So, I'm just going to have to suck it up and go out there dressed to the nines to pose for a self timer.  Blogging is weird, right?


Incidentally, you may still yet see some interesting side projects that I have been working on (cloth napkins! wood burning!)

Is blogging about your life weird when you don't do much? Or maybe it takes a certain kind of person to like blogging? Anyone else out there with me on this?

Monday, May 5, 2014

Red Spice Diamond Skirt

This is actually the very first dress I ever made from scratch! But, I'm sure you're saying to yourself, the title says skirt...  Well, it was a really freaking ugly dress.  And I only did one of the armholes properly, I'm not even sure how. At least I didn't bother putting a zipper in. Need evidence? See Exhibit A below.

Honestly, I don't know what I was thinking when I bought this fabric. It was one of my first fabric purchases, so I'm guessing I was swayed by the gold and ikat-like pattern. But unfortunately, it doesn't really press well, and the gold design is actually really stiff even though the rest is kind of drapey.

Plus, I learned a valuable lesson in pattern placement.
20140505
I finally decided to hack this "dress" up after about a year in limbo. I decided to salvage half of it and turn it into a skirt (instead of turning it into decorative pillow cases which was the only other reasonable thing I could think to do with this fabric). So this is the bottom of a princess seam dress/a paneled skirt.  I cut it off around the natural waist, and made a waistband out of a large rectangular strip on the cross grain and folded in half.  I tried to edge stitch/stitch-in-the-ditch to attach it to the rest of the skirt and didn't really succeed, but it looks passable.

And here's the finally wearable skirt!  I was really stumped on what to wear with this skirt since my go-to is a white cami or tee, but it looked terrible with the beige background of the print.  But luckily, I was able to shamelessly copy Katy of Katy & Laney when I saw her Sahara bustier and skirt.

IMG_4976

The skirt ended up with a nice A-line shape to it due to the slight stiffness of the fabric.

And, this cami (an old gift from my aunt) actually has a really neat feature that I'd never seen before. It essentially has 2 necklines just by turning the shirt around, a v-neck and a square neck.  No tags so it really can be worn both ways.

And the back view! Ok, ok, I know my hair is covering pretty much everything, but I promise there's a short hand-picked zipper in the center back seam.

IMG_4992

So now that you've seen my dirty little WIP secret, anyone else care to share their sewing mishaps? And what does everyone else do when a project goes awry? Chuck it in the trash? Cut it up for muslins?

Friday, March 28, 2014

The Kythera Dress

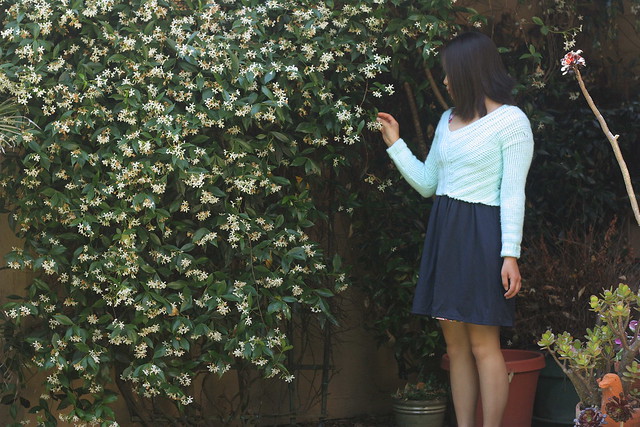
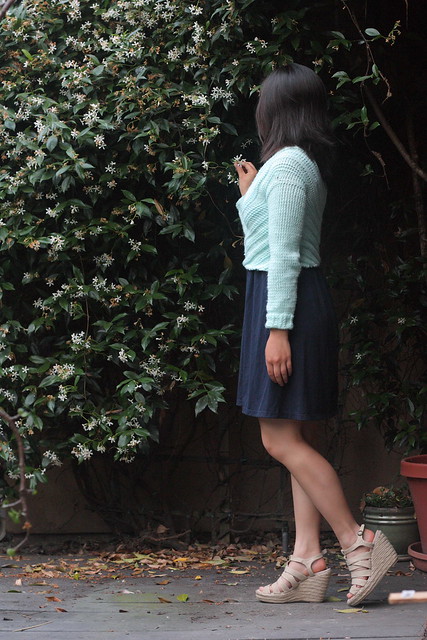
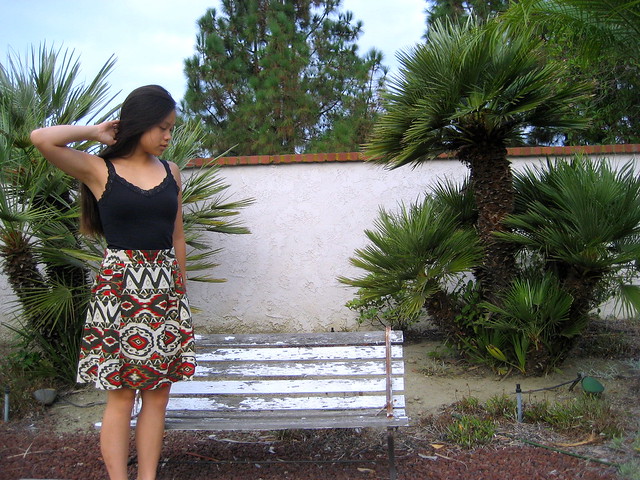
Introducing my second dress! And it's my first self drafted "pattern"! Sorry for all the pictures in this post: Friends, try not to think I'm vain :)

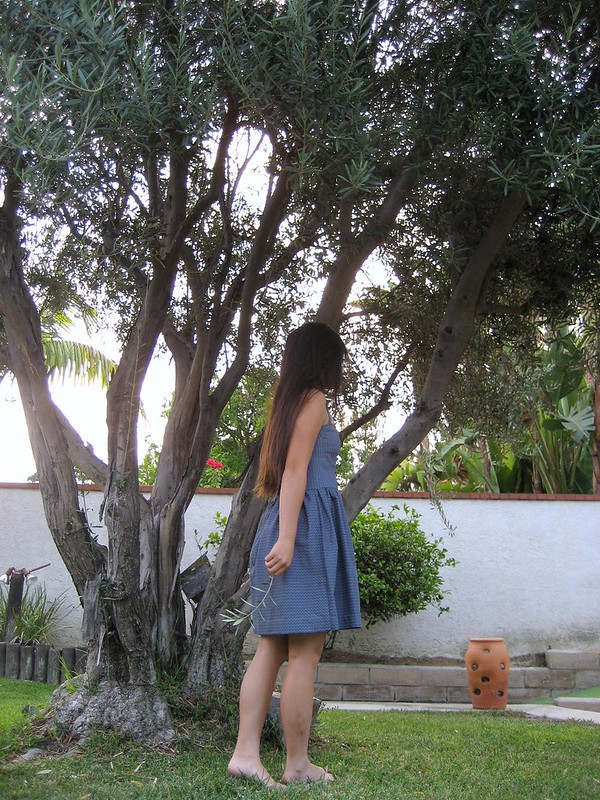
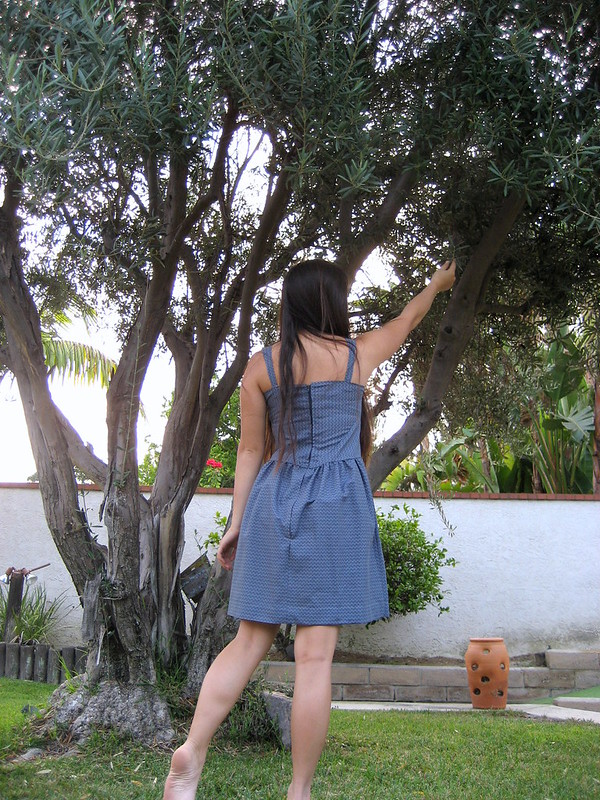
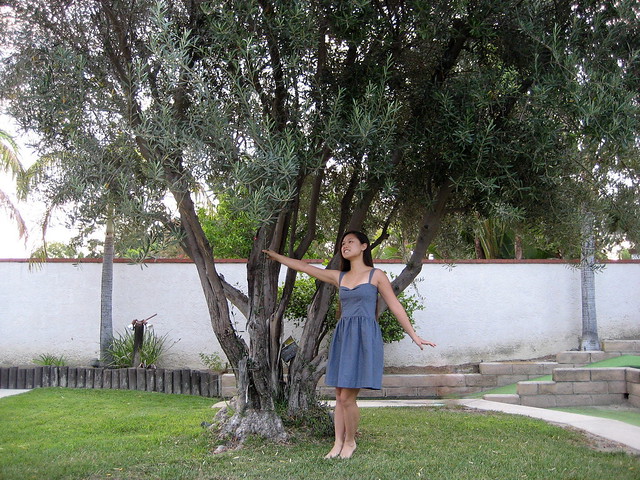
I'm calling it the Kythera dress because all the little squiggly lines and dots remind me of waves and islands of the Aegean Sea. Of course, I had to do my photo shoot in front of an olive tree to complete the Greek theme!

IMG_4944

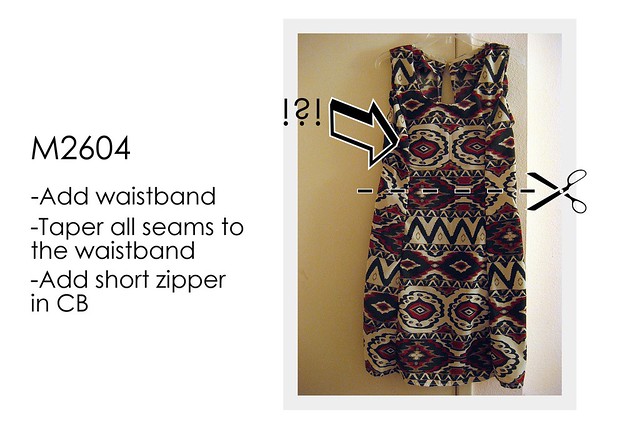
It's a fitted bodice with 2 side bust darts (is that even the word for those horizontal ones under your arms?), 2 waistline bust darts, center back zip, folded neckline, and a full gathered skirt.

IMG_4966

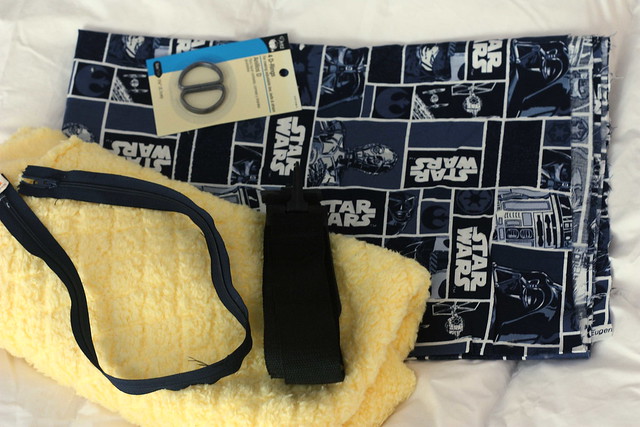
Here's the story. I had literally two scraps of this fabric, originally intended as a pillowcase project I think. One larger piece that I'm guessing was about a yard's worth and another much smaller strip about a quarter of a yard.

I knew from my first dress that 1.5 yards was barely enough for a proper bodice, so I improvised by draping the smaller piece over myself.  I figured I could just put in 4 bust darts like B5748 and call it good.

You can imagine that this is really hard to do without a dress form.  I literally wrapped it around myself right side in, pinned the center back closed, and then pinched out the fabric underneath my bust. And the whole time, I was just thinking to myself, "don't skewer your boob." Seriously, pins against your bare skin is a scary feeling. And they're all wobbly.

What I didn't realize until I had sewn in the side darts was that I needed side seams to hide the ends of the darts, and I had so little fabric I didn't want to take in any on the sides.  I ended up extending the darts to wrap 
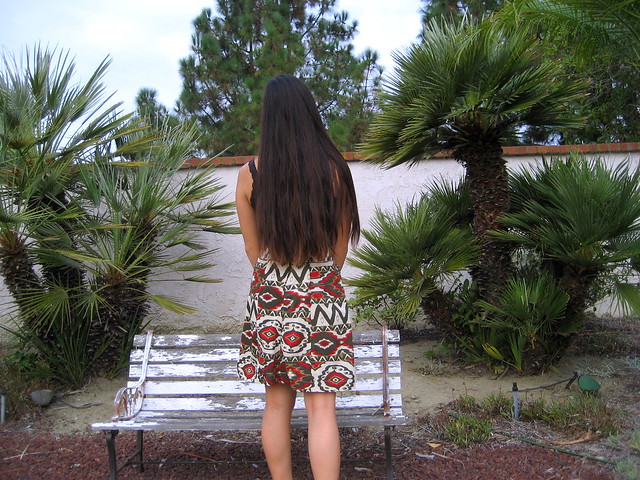
around the back and make a cool little V into the center back at the waist.

IMG_4957

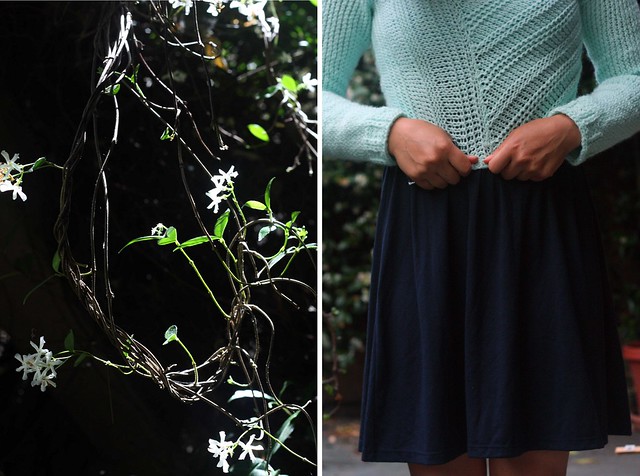
Details, details.. So much catch-stitching on this dress. I turned down the top edge and catch-stitched it so it wouldn't be so obvious, and of course, I also catch-stitched the hem.  It's so beautiful and even because of the uniformity of the pattern :)

I also put in a kind of accordion fold in the neckline in order to give it a faux-sweetheart shape.  I hand tacked the point of the fold down and just let the rest of the fold do whatever.  It kind of just eases itself back to the flat neckline about where the side darts meet the neckline.

And this is literally like the first dress where I don't get gaping neckline, yay! I can bend over and people won't be able to see my bra, plus the tightness of the bodice actually helps the strapless bra stay up! Double win!

Kythera details

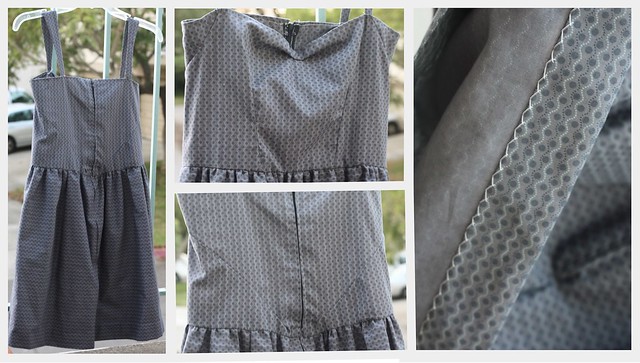
I think these detail shots show the truer color of the fabric; it's more grey than blue. I love the muted colors, it doesn't quite say "look at me!" the same way my other dress does :)

And one more fun touch, I made the straps slightly wider at my shoulders (inspired by, of all things, the style of Hollister tank tops) so it sort of looks like an elongated pointed oval just so the straps were not boring straight tubes.  (Fun fact: I just looked up pointed oval because I couldn't think of what else to call that Venn Diagram intersection shape; it's called a vesica piscis or fish bladder!)

IMG_4938

Summary
Pattern:  Self-drafted! Trying my hand at this for the first time! (And only maybe because I didn't think I could fit any pattern I had onto the amount of fabric I had.)
Fabric:  Maybe about 1 and a quarter yards of cotton
Notions: 18" navy zipper scored at an estate sale!
Techniques used: Hand picked zipper again! So much catch-stitching! Machine gathering (I hand basted and gathered my last skirt)!
Will you make it again?  Eh, probably not, it's a fairly distinctive looking silhouette, plus my design makes it too tight in the bodice and it pulls funny in the back, so the style lines are not quite right.
Final comments: Ok, even though it's a bit tight, and the straps are set a little wide so that they always fall off my sloping shoulders, I love it! I wore it to the last 3 parties I went to, and of course, it helps that I get to modestly say that I made and designed it myself :) I have learned that I need to wear a slip with it if I'm wearing tights because the cotton likes to stick to my tights. Oh, and it's cotton, so I don't feel bad about wadding it up and putting it through the washer and dryer like some kind of heathen.

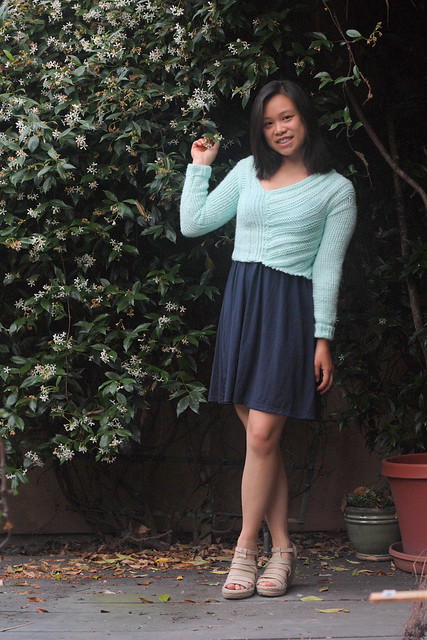
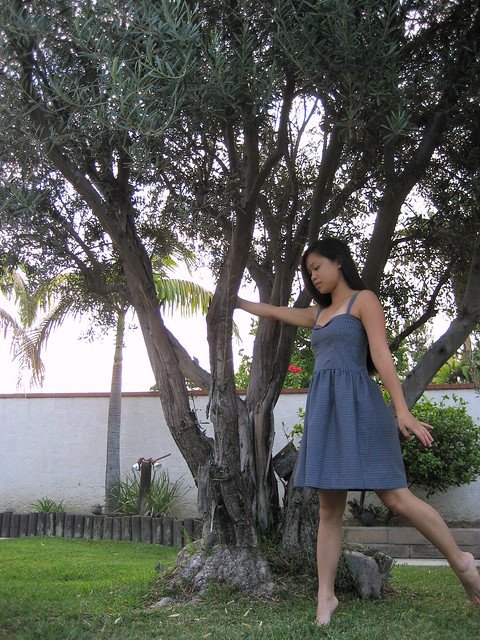
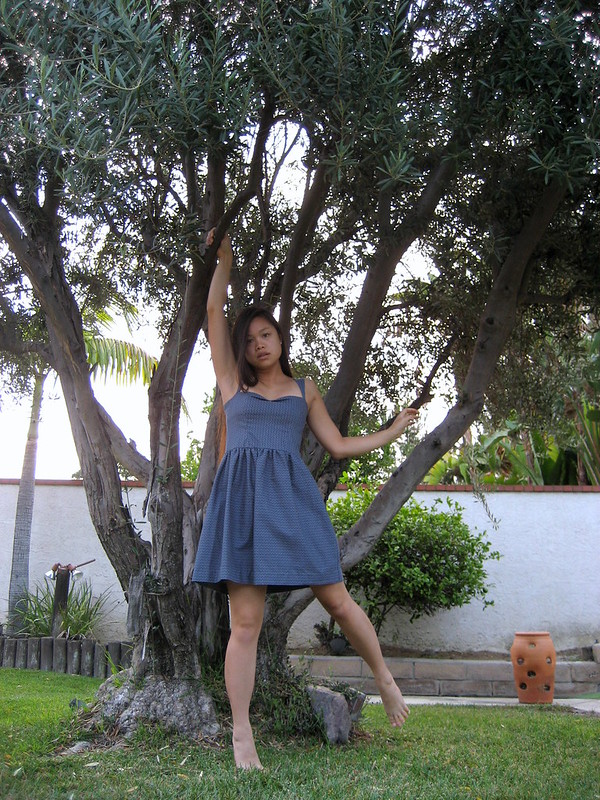
And just for fun, I'll leave you with this picture. I really debated about including this because of my extremely derpy face. But that's sewing blogger life, right? Like a million pictures of yourself with a stupid face just so you can get one good picture of your pretty new dress :) (I'm pretty sure I had just tried to climb up into the tree)  Aaand, I got up at 6am to take these pictures because I wanted the light to be soft, and so no one would ask me any questions about what the hell I'm doing.

IMG_4946

Tell me, do you have any self-portrait outtakes that you actually ended up really liking?

Wednesday, March 12, 2014

Star Wars Laptop Sleeve!

Ok, so this actually started out with an idea that I had after having lunch with my friend.  She mentioned that she hadn't been taking her new laptop to classes because it was bigger than her previous case.  Bingo! Perfect handmade gift for her birthday -- or if my track record with timely gift giving is any indication, more like for the holidays!

I figured, in my head, that I might try a basic zipper pouch tutorial, of which there are a million on craftgawker.  Or at least I would try and cobble something together from a few different tutorials. And then, lo and behold, my past-self rewards my current-self after a casual perusal of my bookmarks folder (yes, yes, so sue me, I probably could better manage these things using Pinterest). This design*sponge tutorial!  Woo! Exactly what I wanted :) Mostly because I love the idea of the wrap-around zipper so it's not so ... over-sized clutch looking?

The lovely case from the Design*Sponge tutorial! Admittedly, I don't love plaid (but just about everyone else in the world does), but I love that cool metal zipper and contrast lining.


DPP_0296
Materials:
-I bought a half-yard of this luscious soft and fluffy fleecy stuff at Joann's in this beautiful buttery yellow.  Can you tell I love this stuff? It's pretty damn expensive (at least to me) for a fleece, but if you can catch it at full price and then use a 50% off coupon, I would love to buy 2.5-3 yards and back a yummy lap/couch blanket with this.  Anyways, the tutorial suggests that you need a half yard of the inner material, but really, you could probably do with a quarter yard or less since you buy the fabric on the fold (if that makes sense? You only need a maximum of a half yard of single fold fabric).  But bonus! Now I have a little leftover, what should I make with it?
-Plus, I totally scored on the Star Wars fabric, since there was just under a yard left on the bolt, so I got it half off! Joann's actually had a small selection of different kinds of Star Wars fabrics, 3 or 4 different prints I think, but I liked this one the best because of the graphic geometric look of it.  I also saw some other great nerdy prints... :)
-I also bought some metal D-rings because I kind of wanted to make this a wearable laptop case, if I could swing it, instead of something you put inside your backpack or work tote because I assume that's what my friend's problem was in the first place.
-Long zipper, probably a 22" one, I fortunately had this navy blue one that I bought at an estate sale. 
-And to top it all off, a salvaged luggage strap for carrying. I almost bought some webbing and notions while at Joann's, but I figured I had enough junk lying around at home that I must have at least one spare strap from some bygone luggage.

laptopcase2

Look at my corners! So neat and clean! And check out those cheeky little tab holders for my D-rings.  I had to hunt carefully to find and cut out the faction symbols....and then re-cut them because I forgot to give myself a seam allowance.

It was super easy to follow this tutorial since there were some really detailed process shots.  The only part where I got kind of confused was where the bottom part was sewn up to meet the zipper seams.  I couldn't really get the foot to go over the zipper bulk, so I ended up ladder stitching the rest of it.

Sorry to make you go through all that introduction, but ta-da! The finished product!

DPP_0303

I'm really very pleased with myself for making this! I think it looks really nice, no extremely obvious mistakes  :)

After making this and then letting it sit for a while, I decided to make a few changes:

1. Nix the D-rings and the strap and just leave it as a fun little case protector.  The tabs were too flimsy to really do a good job, I think it would have worked a lot better with webbing underneath the tab, and probably also a slightly different design with the webbing wrapped around the bottom to give it strength.

2. Give the fleece a haircut near the zipper. Can you see all that fluff near the teeth? The zipper kept catching as I was testing it out, so I just took my scissors and trimmed it down.  It wasn't too difficult, I just had to be careful to not cut a hole in my lining.

DPP_0302

I really hope my friend likes it and uses it!  I always worry that I end up making really weird things that people won't actually use.

Thursday, February 6, 2014

Awesome and (fairly) easy crocheted flower potholders

Sorry for the radio silence around here, but you know how it gets around the holidays, right? Traveling and involuntary internet breaks was the norm for me in December and January.

Plus, holiday crafting. Ugh. Don't even get me started on how awful it is.  It's nice to think that you'll make some people their gifts this year, but then you forget about it until December.  And then everything goes to hell in a hand basket.  That's why all the hardcore crafters do "Christmas in July" isn't it??

Enter the Crochet Flower Hot Pad on Ravelry.  Super interesting to look at, yet a piece of cake to crochet (and it's free!).  What's not to love? I was able to whip up several of these in a short amount of time, however there's a huge caveat here.  I could have left them as-is after crocheting, but I wanted these to be more or less functional as potholders too.  I couldn't have all those holes in them, so I decided I wanted to sew up all the holes. This took twice as long as the actual crocheting, probably due to the striping, since I wanted to make the seams as unobtrusive as possible.

I made a bunch of these for my aunts while I was visiting over the holidays, it was like kitsch-on-demand! Everyone wanted one as soon as they saw me making one (I was initially only making the 2 for N's parents as a thank-you-for-hosting-me gift). 

I did them all up in Lily Sugar'n Cream cotton yarn, and I really do love them even if I didn't get to keep a single one and they drove me crazy. Plus, they use hardly any yarn at all.  I probably squeezed 5 of them out of a single ball of the Ecru.

DPP_0295

Made these two pretty colorways for N's parents.

DPP_0294

See the picture above for all the seams I had to close up, and I did it all in the secondary color (orange here). I used one long tail to sew them all closed so I had to be very careful to stay within the correct stripe as I went from seam to seam. It was aggravating, and if I never crochet another one of these for at least a few months, I'll be happy.

'Til next year easy-but-aggravating pattern!