Monday, April 27, 2015

The Graduation Dress

Now, before you all ask me about the title, I made this dress last year for my brother's graduation from high school. I repeat, I am not a proud recent alumna of anywhere.

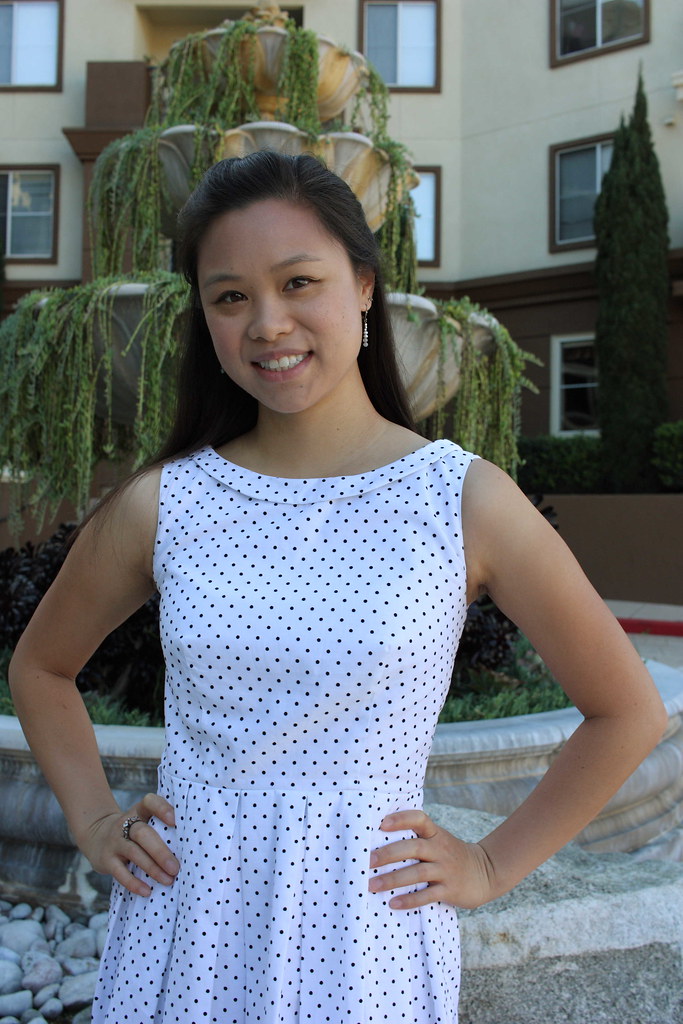
And yes, it did take me almost an entire year to blog this dress (I made it for a June 2014 graduation), but I have ideas. These ideas usually involve lots of searching for what I think might make the perfect backdrop to complement said dress and what I think those photos should look like. I waited until spring break this year to get this picture because this cool succulent fountain is directly across the street from a bus stop where there are usually at least 50 students waiting for the shuttle. And hell if I'm going to be taking pictures with that many people watching.

Anyways, all that nonsense aside, this is my first lined dress! And third dress ever!

Graduation Dress

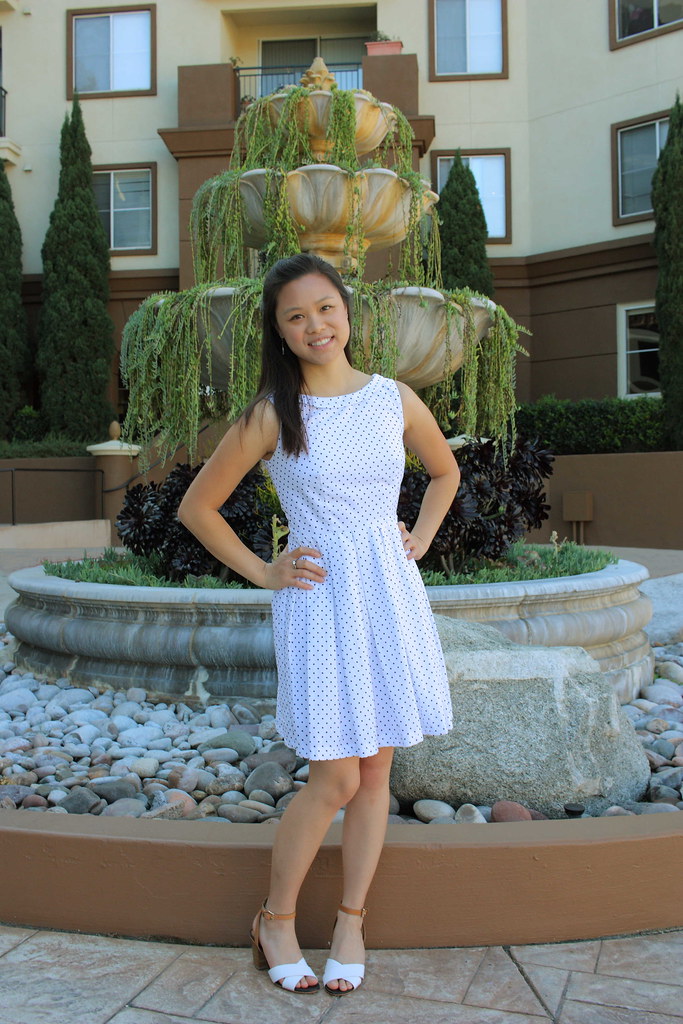
I found this neat fabric that is a white cotton with tiny black flocked dots, so fuzzy! It's fun to pet when I'm wearing it :)

Graduation Dress

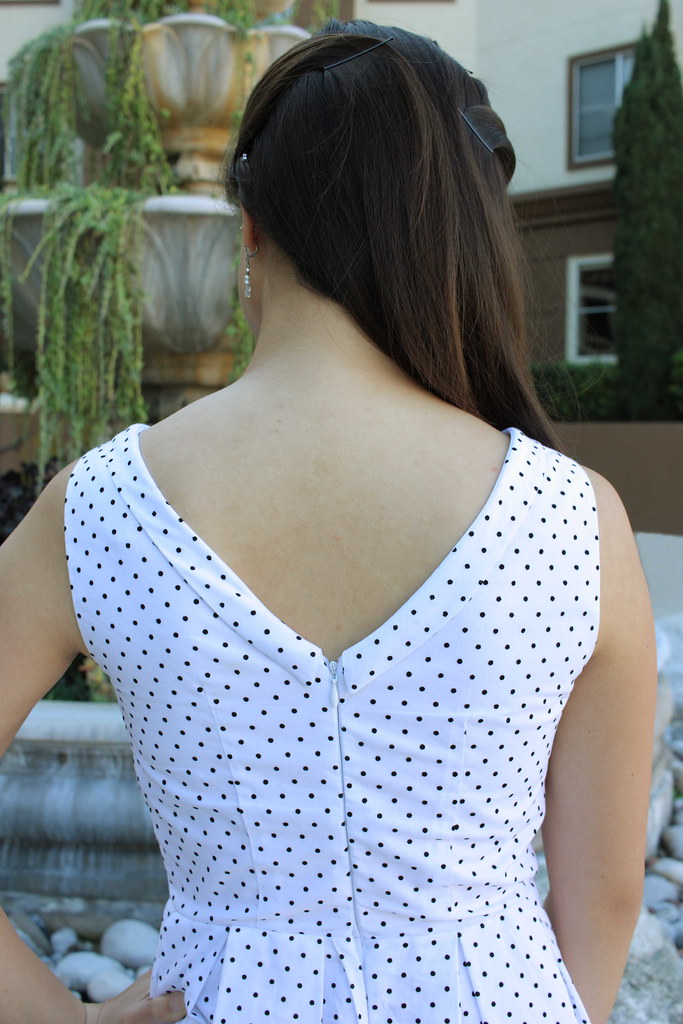
And the fun back detail! Check out that invisible zipper! Can you believe this is the first time I've ever put one in? Not bad, huh? I did however accidentally pinch a pleat in the skirt so it does look a little funny, just something to remedy for next time. I did have some trouble zipping it up right after I put in the zipper because of all the bulk at the waist seam - invisible zippers are just not that strong. Because there are two lines of stitching I just unpicked a few stitches of the line closer to the teeth at the waist seam (based on internet advice) and it totally worked! You can see it pulls apart a little there revealing the zipper, but it doesn't bother me.

Graduation Dress

The pretty collar! I had to tack it down to the bodice front because it kept flipping up otherwise.

And here's some flat shots:

Graduation Dress Front

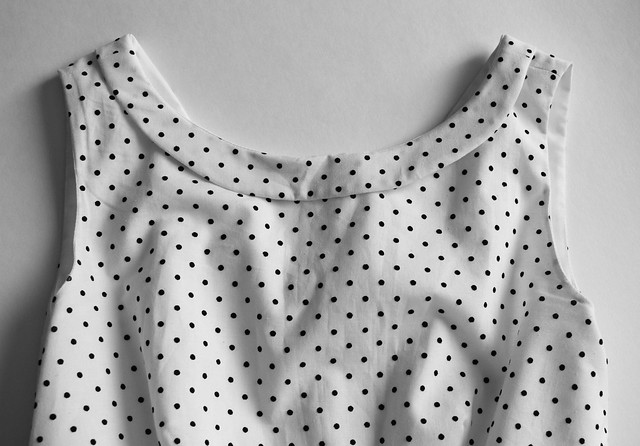
I actually used fusible webbing instead of interfacing for the collar because it's what I had on hand, and it seems to be fine. As I mentioned, I just hand tacked the collar in the very center to keep it from doing anything weird.

Graduation Dress Back

Graduation Dress Inside Lining

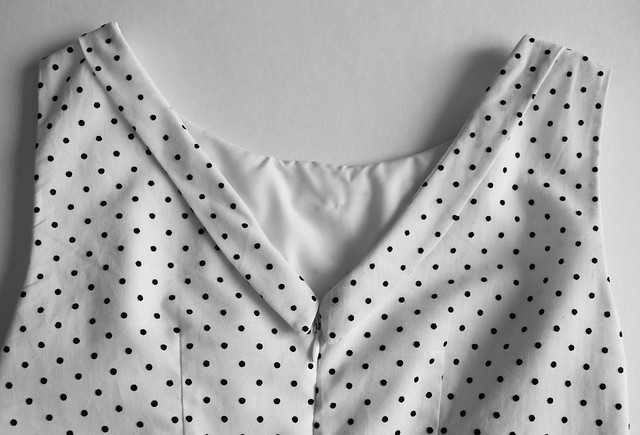
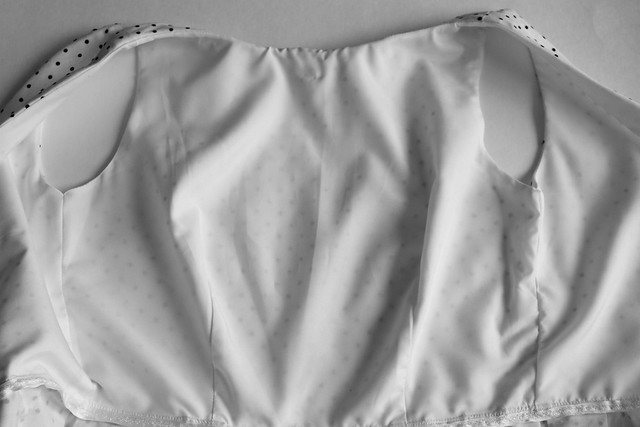
Here's the inside! Isn't it so clean? I only lined the bodice because I didn't really feel like doing the skirt too so I just wear a half slip underneath since the white is a tiny bit see through. I'm so pleased with how it turned out for my first time lining a bodice. I also french seamed the skirt pieces so the inside of this thing is super neat! Absolutely no messy zigzagged edges like I usually finish a seam with.

Graduation Dress Waist

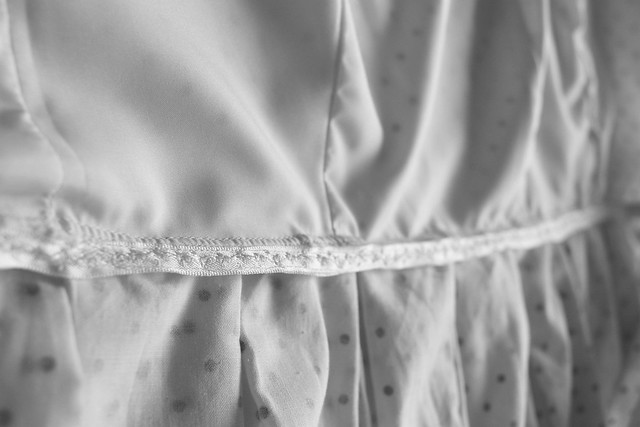
I had the crazy idea to use a bit of grosgrain ribbon to enclose the raw edge at the waist and also add a bit of stability a la a waist stay. This is two pieces of floral grosgrain ribbon, one one either side and then sewed at both edges. I won't say it's the best idea I ever had because it certainly caused some problems during construction, but it turned out all right.

Details:
Pattern: Prom Perfect from the Peppermint Magazine Sewing School (scroll down to Issue 17 - free!)
Size: Small
Fabric: 1.5 yards of a flocked dot cotton from JoAnn, white poly "posh" lining from JoAnn
Notions: ~22" white invisible zipper, less than 1 spool grosgrain ribbon
Size Alterations: None
Design Changes: Chopped off a ton of length at the hem so that it sits at about 1" above my knee. Not a fan of midis.
Techniques used: Clean finish lining, installing an invisible zipper
Construction Notes: Basically ignored the instructions that come with the pattern and went with the clean finish order of construction. I had way too much bulk at the waist seam so the zipper wasn't zipping the first time around, so I unpicked a few stitches at the waist seam, and I was then able to get the zipper up. Hand sewed the lining to the zipper once it was installed in the fashion fabric because I still can't figure that shit out.
Will you make it again? I'm thinking yes! It's really cute, pretty simple but interesting cut at the same time. I do need to take a SBA on the next version though because my bust darts are looking a little pointy/baggy at the apex. I need to adjust the armscye too because it is a tad tight right now.
Final thoughts: Love this dress! I feel this is very much the style I like: sweet and a little retro/vintage. The fabric pairs perfectly with this pattern, and it's just so wearable!

Monday, April 20, 2015

Lovebirds

I'm on a roll! I'm slowly working through my backlog of photos for the blog which is why you're hearing so much from me lately! I just like to spend my time making instead of fussing with html for blogging :) Also, I'm about to go into quilting hibernation, and I won't come out until those quilts are done! I'll still be on Instagram, but I'll keep the blog quiet so I can knuckle down and get these quilts made before the weddings in July and August :)

And speaking of weddings, here's a cute bridal shower gift I made for my friend when she got married last November (which I kind of still can't believe).

Crocheted Lovebirds

I used the (free!) Cute Bird Pattern by Lisa Auch on Ravelry and you can view my own modifications here.

Crocheted Lovebirds

As you can see, this is not my first time giving nested lovebirds to newlyweds. I'm still on an impractical gift giving kick! (But I did get them something off the registry anyways).

Crocheted Lovebirds

I just used puffy paint for the banner instead of embroidery on this version, which saved me a ton of time. Plus, I'm definitely an embroidery n00b, so my stitches never turn out all that pretty. Let's call it charming.

Crocheted Lovebirds

One last thing, can we talk about how everyone seems to know social conventions about these kinds of things except me?? And when I say "these kinds of things", I'm talking bridal showers, engagement parties, weddings; all things I am expected to know about because I am a ~girl~ apparently. Where are you all learning about these things? Is there a secret "girl basic training" that I forgot to go to??

Well, don't mind me, I'm just going to sit in the corner over here and knit then. I'm planning on bringing my knitting to a bachelorette weekend, is that a huge faux pas?

Monday, April 13, 2015

DIY Woodburned Bamboo Cutting Boards

Whoops! I kind of forgot I didn't talk about these cutting boards yet with my other Christmas gift handmades. 

I bought a set of 3 different sized cutting bamboo cutting boards for about $10 at Ross.  There's not too much to add about these that I haven't already said about the wooden spoons, so I'll let the photos speak for themselves. I used these three pins for the designs, but again, I have just free handed it onto the board with a pencil without tracing.

Woodburned Cutting Board

This one was the smallest board which is why I went with a full floral border. it was almost all done with my fine point tip with some of the small triangle leaves done with the universal tip.

Woodburned Cutting Board

Woodburned Cutting Board

This was the medium sized one, and I used both the fine tip and the flow tip. It seemed a little like there was a waxy residue building up on my fine tip, so watch out for that if you also choose bamboo. How cute is this little bird?

Woodburned Cutting Board

Woodburned Cutting Board

And finally, this was the largest of the three, and the only one that I did in a more seasonal (holiday) design. I think I used the flow point exclusively on this one.

Woodburned Cutting Board

They're almost too pretty to use, but I do hope that their recipients will at least use them to serve cheese or something :)

Woodburning has been a really fun little thing to do and has great wow factor! I think my mom will be enlisting my services to do some more spoons for her sisters this year :)

Monday, April 6, 2015

Fleece Lined Cat Pajamas

I made some super cute, super warm pj pants! I just couldn't pass up this cute kitty print, but what else can you make with flannel but pajamas?

Flannel and Fleece Cat Pajamas

I used this tutorial from My Cotton Creations to create some almost adult sized pajama pants.

Flannel and Fleece Cat Pajamas

And now you see what I mean. I had to include the selvage in order to get things to fit (and even then I had to flatten out the crotch curve). Because flannel comes in ~45" width, I would not recommend using this tutorial to make pants for anyone larger than a size 0 in RTW sizing. Believe the other lady when she says this is for kids. However! I might suggest using a cute printed fleece, those come in 60" widths (I think) and JoAnn has a pretty decent selection. That way you can get away with buying fabric for the length of your legs! This means one cut of ~1.5+ yards instead of 2 cuts.

Flannel and Fleece Cat Pajamas

Front and back. I copied some pajama pants I own to get the basic shape of the curves, but I needed to flatten out the front curve and add some to the back.

Flannel and Fleece Cat Pajamas

And a very important visual reminder that was not emphasized enough in the original tutorial (that I did actually forget). Make sure your waistband can stretch! Learn from my mistake! Luckily (unluckily), I am shaped like a flat board, so I can get that waistband over my hips/butt without needing the stretch from the elastic, but it's not as comfy as it could have been.

Flannel and Fleece Cat Pajamas

My waistband with useless elastic. I tucked the fleece into the fold of the waistband and then folded under the flannel so it makes a pretty seam.

And here are some more insides shots in which you can see the fleece lining. This is just your basic anti-pill blizzard fleece, nothing fancy. I underlined the flannel with the fleece which means my seams are still sticking out, but it's not that bad since there's only 3 seams. To finish the seams, for the flannel's sake, I trimmed the flannel so it was enclosed within the fleece in the seam and then just sewed it up since fleece doesn't fray. Easy!

Flannel and Fleece Cat Pajamas

The inseam is one looong seam from cuff to cuff.

Flannel and Fleece Cat Pajamas

And the cuffs, same deal with the waistband with strategic tucking and folding. Turned under twice and top stitched down.

Flannel and Fleece Cat Pajamas

Ahh, the perfect length, just grazing the tops of my feet. Usually, I have to roll my pants up at the waist so they're not crazy long.


Details:
Pattern:  Tutorial from My Cotton Creations
Size: Based off a RTW pair I own
Fabric: 1.5 yards of snuggle flannel and 1/5 yards of anti-pill blizzard fleece
Notions: 1/5" wide elastic
Construction Notes: As mentioned above, don't make the same crotch curve for the front and back, copy the back curve from your other pair, and flatten out the front so it's more of a slanted line than a real J.
Will you make it again? Maybe. While I really only need one pair of kitty pajama pants, I would like to have a pair that fit better. And in my infinite wisdom, I already have flannel and fleece for another pair. However, I may try another pattern.
Final thoughts: Yay kitty pants! These things are fun, don't include upside down prints (grr cheap RTW), and are crazy warm thanks to the fleece. In fact, when I was in Philadelphia, I would wear these around the house at night and actually get too hot and have to change into some shorts instead.

And I'll leave you with this hilarious outtake/really bad posing.

Flannel and Fleece Cat Pajamas

Oh pants, you're so funny.