This more or less captures the essence of my holidays (but my life is not as cute as this illustration).
There was a lot of crafting, cat petting, eating, and snuggling up in my new giant scarf and pj pants.
Illustrations from a McDonald's ad (with this adorable song) if you can believe it :)
I just got back from Philadelphia, so I've been getting back into the swing of things with work and cleaning my room after the craftermath of the holidays. Look for a couple of handmade gift posts coming soon!
In other news, I've joined Instagram! You can follow me if you like - it'll mostly be craft WIPs, bikes, guinea pigs, and San Diego!
Let's hope 2015 is a more productive year around the blog :)
Wednesday, January 14, 2015
Wednesday, December 10, 2014
Everyday Cloth Napkins

We used to use a lot of paper napkins and paper towels when we ate our meals, and it seemed so wasteful to throw away so much paper that didn't even get that dirty. (I like to think we're pretty clean.) We finally decided to take the plunge and go the cloth napkin route, but we still use paper towels in the kitchen because eww no - I can't even imagine "reusable" kitchen rags let alone cloth diapering *shudder*.
We went and picked out several cute quilting cottons (100% cottons seem to be the best and cheapest for the job), and I bought 1/2 yard of each. 1/2 yard = 2 napkins. At first I tried to do a general color scheme, but I quit that real fast so now I can indulge my whimsical erratic style with whatever fabric strikes my fancy. Also, it's fun to pick out stuff from the red tag clearance section when it's an additional half off.
I'm sure there are many tutorials out there on how to do this, but I liked this one by Pretty Prudent the best. I cut my squares into 18"x18" (because 1/2 yard = 18", but of course you could always get a 22" cut and squeeze out exactly 2 napkins from 42" fabric). I then pressed ~1/4"-1/2" hem and again - just eyeballed it, no need to measure.

Ahh, a beautiful mitered corner! Tip: If you're going to make several of these at a time, do it assembly line style, and do all the marking, then all the corner seams, then the final hem. It goes pretty fast this way! I've already made four more napkins since I took these pictures!
It's so much fun to have these pretty and colorful napkins at the dinner table. We like to pick out which ones "go best" with the overall feeling of the meal, is that totally weird?
And while we're being totally honest, we like to wash these after several uses, they're just not that dirty after a single use. What's the consensus on this one? (If you use cloth napkins) Do you wash them every time or are you ok with just throwing them in the laundry when the load has a little extra room? Chime in and let me know if you agree or think I'm a dirty dirty slob! :)
Wednesday, October 29, 2014
Reusable Shopping Bag
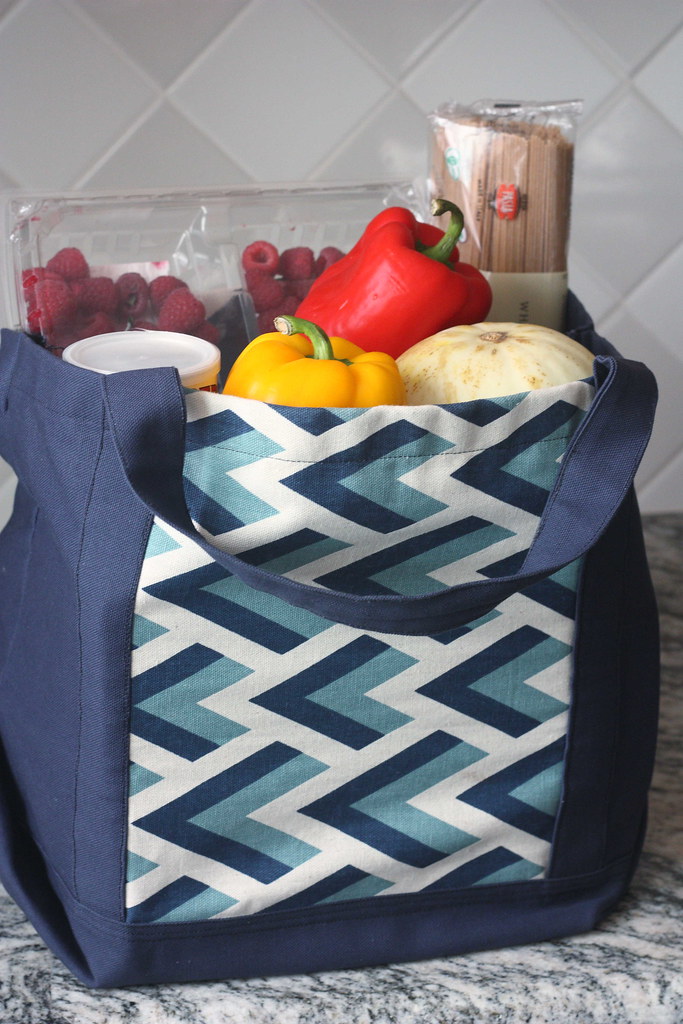
I've been flexing my sewing muscles lately by making a new grocery bag! Our old bag was a freebie I got at work and was at the point of disintegrating (and butt ugly to boot!). I forget exactly who said it, but life is too short to be carrying ugly bags! It was the kick in the pants that I needed to whip up this shiny new bag.
I found this beautiful printed canvas at Hobby Lobby, and I couldn't leave without it, but since I didn't have a project in mind for it, I bought a measly quarter yard and figured I'd whip up a basic tote bag or something.
Fortunately, after a little scrolling through Pinterest, I discovered this genius tutorial from Terry Ann for a sweet new shopping bag with the front and back as one whole piece so you don't ever have to worry about the bottom collapsing and falling out under the strain of too many groceries!
Since I'd only bought a quarter yard of the printed canvas, I also picked up slightly less than a yard (end of bolt!) of navy duck canvas from JoAnn. It matches pretty well to the navy in the printed pattern I think! It's wonderfully sturdy and gives the bag a nice solid structured feeling, y'know, for lugging your gallon of iced tea home from the store.

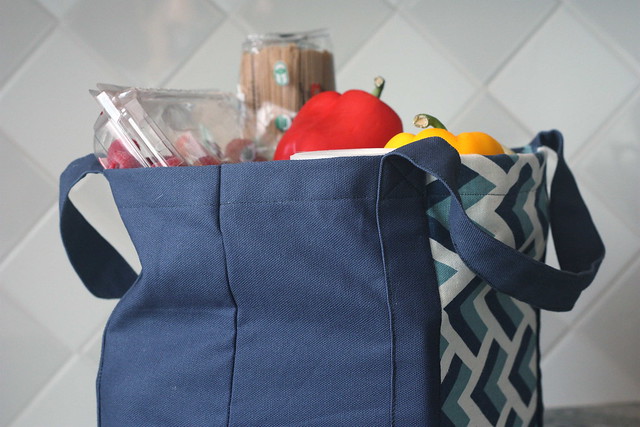
I followed her tutorial as written and just overlaid my printed fabric over the canvas and stitched my handles so that they covered the raw edges of the fabric (my handles are set a little wider than stated for just this reason). I stitched my handles on with a box x stitch for extra strength - not sure how true this is, but it is my impression that it is a parachuting standard for making sure the seam does not come apart.

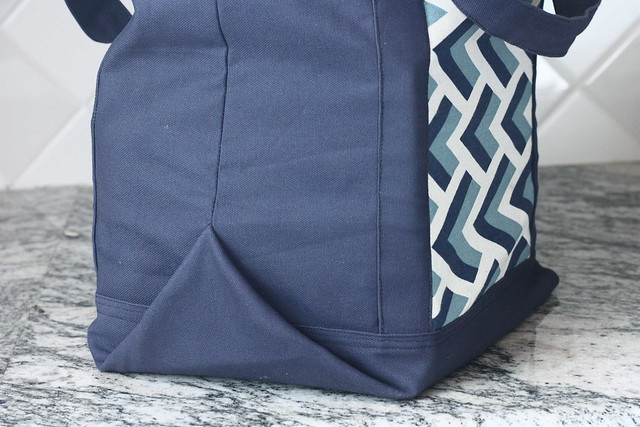
Terry Ann calls for home decor weight fabric, and of course her pleat is so nicely pressed, but I could not get mine to lay flat at all, so it is what it is. I actually finger pressed everything where she calls for an iron because this fabric actually held a crease pretty well from me just smashing the fabric into a fold - bonus, no burnt fingers from the iron!

This bag can hold just a ton of stuff, volume and weight-wise, so it's a really great shopping bag!
I used the plastic piece from the old shopping bag to give the bottom a little bit of shape, but my other go-to for stiff plastic for stabilizing is plastic canvas for cross-stitching. It's super cheap and easy to find, I got mine from Michael's, and really, where else are you going to find a big piece of stiff plastic?
I feel like it's so easy to buy those 99 cent bags at pretty much every store, and they're always made out of that flimsy material. And I'm not knocking it, it's better those than plastic bags (California bag ban ring a bell?) but why not have something sturdier and prettier? So, anyone else making their own reusable shopping bags?
I found this beautiful printed canvas at Hobby Lobby, and I couldn't leave without it, but since I didn't have a project in mind for it, I bought a measly quarter yard and figured I'd whip up a basic tote bag or something.
Fortunately, after a little scrolling through Pinterest, I discovered this genius tutorial from Terry Ann for a sweet new shopping bag with the front and back as one whole piece so you don't ever have to worry about the bottom collapsing and falling out under the strain of too many groceries!
Since I'd only bought a quarter yard of the printed canvas, I also picked up slightly less than a yard (end of bolt!) of navy duck canvas from JoAnn. It matches pretty well to the navy in the printed pattern I think! It's wonderfully sturdy and gives the bag a nice solid structured feeling, y'know, for lugging your gallon of iced tea home from the store.

I followed her tutorial as written and just overlaid my printed fabric over the canvas and stitched my handles so that they covered the raw edges of the fabric (my handles are set a little wider than stated for just this reason). I stitched my handles on with a box x stitch for extra strength - not sure how true this is, but it is my impression that it is a parachuting standard for making sure the seam does not come apart.

Terry Ann calls for home decor weight fabric, and of course her pleat is so nicely pressed, but I could not get mine to lay flat at all, so it is what it is. I actually finger pressed everything where she calls for an iron because this fabric actually held a crease pretty well from me just smashing the fabric into a fold - bonus, no burnt fingers from the iron!

This bag can hold just a ton of stuff, volume and weight-wise, so it's a really great shopping bag!
I used the plastic piece from the old shopping bag to give the bottom a little bit of shape, but my other go-to for stiff plastic for stabilizing is plastic canvas for cross-stitching. It's super cheap and easy to find, I got mine from Michael's, and really, where else are you going to find a big piece of stiff plastic?
I feel like it's so easy to buy those 99 cent bags at pretty much every store, and they're always made out of that flimsy material. And I'm not knocking it, it's better those than plastic bags (California bag ban ring a bell?) but why not have something sturdier and prettier? So, anyone else making their own reusable shopping bags?
Wednesday, August 6, 2014
A Crocheted Boutonnière
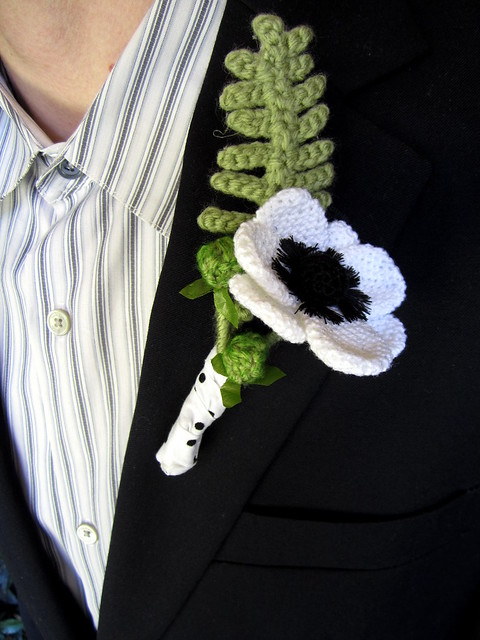
So I had sometime ago thought about what to get my brother for his birthday seeing as I have little idea about what he might like/want (I got him a comb, lol). I had always thought it would be really cool to do an entire bouquet of crocheted flowers, I even tried to copy this Saipua arrangement once upon a time (I love their aesthetic), but it didn't really come together.
I thought it might be time to give that idea another go, and I thought I could make my brother a cool boutonniere for his prom. Since it's pretty customary for the guy to get a tie/bow tie to match his date's dress, I didn't want to sew him a tie or bow tie because I had no idea the color of the dress. I tried to play it safe with a black and white color scheme.
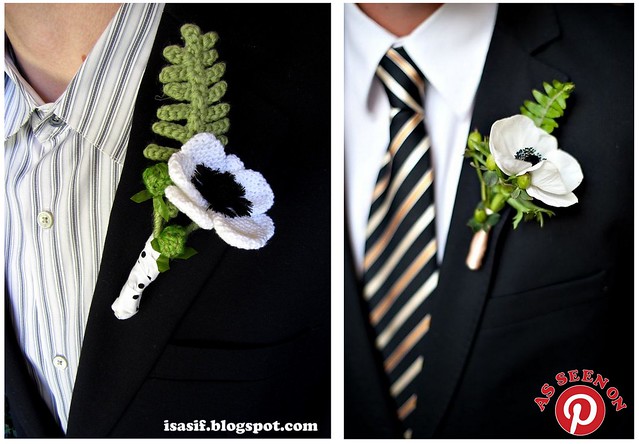
Because I went with black and white, I picked anemones as my main flower since I love those and searched around on Pinterest until I found something that I liked. (See also picture below right)

What do you think? Did I get it right?
Some details about the construction:
-I used a pair of super strong neodymium magnets to keep it in place on the lapel, no awkward pins, hooray!
-I made up the pattern for the flower and the fern as I went, but it's just a basic round shape flattened and sewed together. I think it has a total of 6 petals.
-I used worsted yarn for the fern and bobbly things, crochet thread in white for the petals, embroidery floss in black for the center, and black sewing thread to make the fringe. I wrapped the whole thing in a scrap of white cotton with black flecked dots to continue the black and white theme (plus the stems were a little hideous)

I made the boyfriend get all dressed up on the upper half and stand outside patiently so I could stand on a chair and take close up pictures of his lapel :)
I think this would work really well for a wedding too! Plus it's super reusable :)
Anyone else ever try to recreate things from Pinterest?
I thought it might be time to give that idea another go, and I thought I could make my brother a cool boutonniere for his prom. Since it's pretty customary for the guy to get a tie/bow tie to match his date's dress, I didn't want to sew him a tie or bow tie because I had no idea the color of the dress. I tried to play it safe with a black and white color scheme.
Because I went with black and white, I picked anemones as my main flower since I love those and searched around on Pinterest until I found something that I liked. (See also picture below right)

What do you think? Did I get it right?
Some details about the construction:
-I used a pair of super strong neodymium magnets to keep it in place on the lapel, no awkward pins, hooray!
-I made up the pattern for the flower and the fern as I went, but it's just a basic round shape flattened and sewed together. I think it has a total of 6 petals.
-I used worsted yarn for the fern and bobbly things, crochet thread in white for the petals, embroidery floss in black for the center, and black sewing thread to make the fringe. I wrapped the whole thing in a scrap of white cotton with black flecked dots to continue the black and white theme (plus the stems were a little hideous)

I made the boyfriend get all dressed up on the upper half and stand outside patiently so I could stand on a chair and take close up pictures of his lapel :)
I think this would work really well for a wedding too! Plus it's super reusable :)
Anyone else ever try to recreate things from Pinterest?
Wednesday, July 23, 2014
A Freshly Minted Sweater
You guys, I knitted a sweater! It started out with a false start, then got a little rocky, but the big reveal is below. (Spoiler! It's totally wearable!)
I totally blame all the talented knitters on Kollabora giving me serious knit lust. But you can see that I've only made knit scarves before and only with two patterns (I made the Vite cowl 3 times and the ruffle scarf 3 times). So, I thought I would start my sweater knitting journey off simply with a piece that was knitted flat and seamed up.
I used the Corrugated Asymmetrical V-neck sweater pattern from Teva Durham's Loop-d-loop book which I had bought on a lark at a used book store, only 75 cents! It only has 2 pieces and 4 seams, and there's nothing much crazier than knits and purls.
You guys, I'm scared of cables, but at the same time I am totally infatuated with cabled sweater patterns. Somebody teach me! (I want to make this Severus pullover so bad in that awesome jade green colorway. And also Neville's sweater when I learn colorwork. My knitting eyes are obviously way bigger than my stomach. Also Harry Potter, ahh!)
I had this pound of love acrylic yarn in this minty green, and I figured this was the most yardage of anything I have, it'll be perfect for making my first sweater since it might be an unmitigated disaster. I only have one set of needles, and I wanted to use this yarn, so I basically fudged the gauge and called it close enough with stretching. I wanted it to be somewhat tighter than the picture anyways.
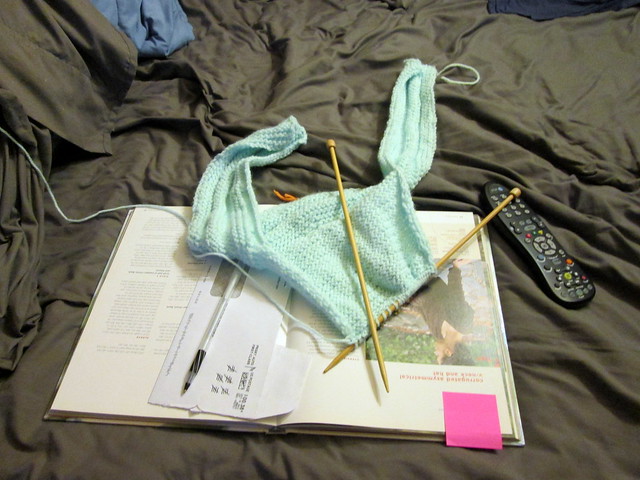
I cast on twice as many as the smallest adult size thinking I could match gauge by adding more stitches. But I learned, that's not how you do it, and the piece I started with was not what I thought it was. I basically had the idea that I was knitting from the waist up. I knitted a few rows before I realized something crazy was going on and then I ripped it out and started again.
So when I started, it looked like this (see below). And I was thinking, there's no way this is going to be right. It looks like a uterus. This is after I ripped out the first try. This is actually one of the sides of the sweater, you turn it sideways when you seam it together with the other piece. I actually had started knitting the sleeve flat in this picture.
I also learned that I have freakish hulk arms and that I should probably size up in the sleeve or not decrease so dramatically. The first sleeve I made was according to the pattern and it was comically tight and stretched out on my arm. I debated making another but figured it would be more wearable if I did, so I scrapped the first one.
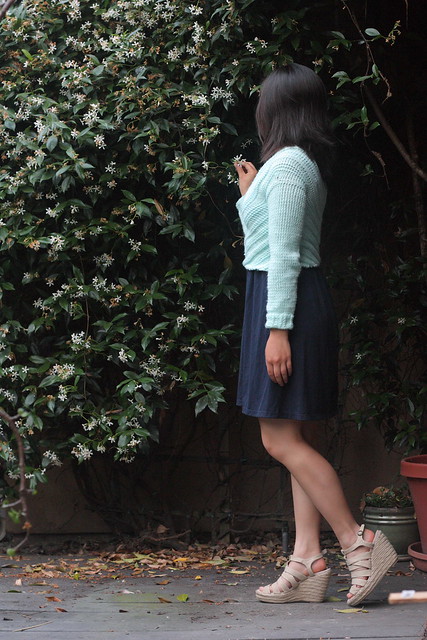
But here it is after all the trouble! I shamelessly copied Kendi's styling with this mint and navy combo. It's so brilliant together though, right? Totally fresher than mint and black which is what I would have defaulted to.
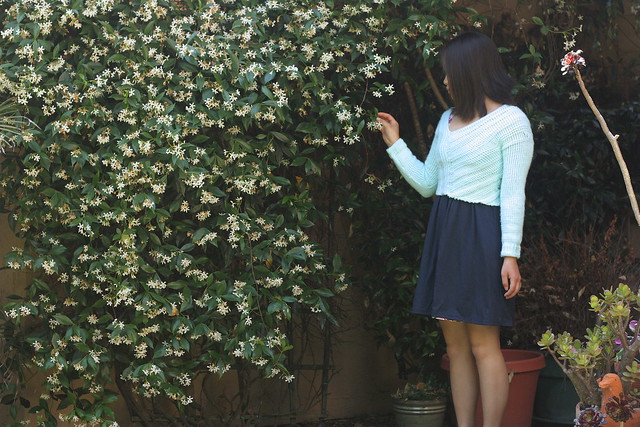
The jasmine blooms for about a week in the course of an entire year and then all the pretty blossoms promptly turn brown and fall off. I tried to get these pictures in before they all started dying because that bush is pretty marvelous if just for that one week.
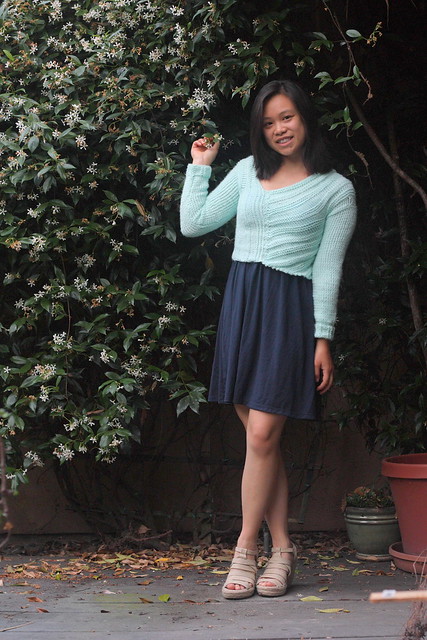
I actually nixed the corrugated pattern on the sleeves since I thought they looked kind of frumpy and opted for stockinette all the way down and then used a modified rib knit for the cuff. I thought it would be fun to have a nonstandard cuff so I finally settled on [K1, P1, K1, P3] repeat around the cuff.
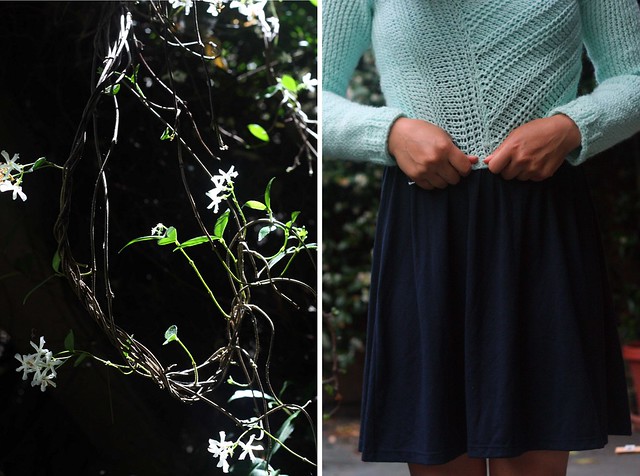
I think it ended up a little short (and tight!), so it's more of a cropped sweater.
Totally learned and practiced my JSSBO (Jeny's Surprisingly Stretchy Bind Off) on the cuffs! I made the mistake of using a traditional bind off on the first extremely tight sleeve, and it was all I could do to get it over my hand.
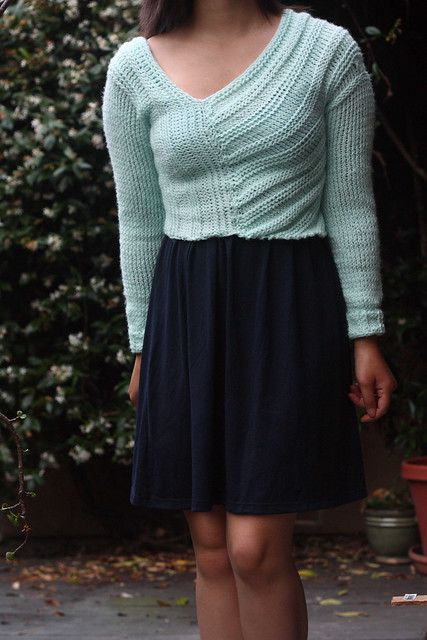
Strappy dresses/tops only under this thing I guess since the neckline is so weird. It's definitely a cool effect though.
I have no idea how much yardage I ended up using, but there is still a comically large ball of yarn left even though I was convinced I was going to use up much more than I did.
Not bad for my first try, eh? I still have yet to wear this out anywhere (do I dare?) but it's been quite hot, so that's my excuse. I actually have a second sweater in the works right now, and it's already looking much better than this one!
I totally blame all the talented knitters on Kollabora giving me serious knit lust. But you can see that I've only made knit scarves before and only with two patterns (I made the Vite cowl 3 times and the ruffle scarf 3 times). So, I thought I would start my sweater knitting journey off simply with a piece that was knitted flat and seamed up.
I used the Corrugated Asymmetrical V-neck sweater pattern from Teva Durham's Loop-d-loop book which I had bought on a lark at a used book store, only 75 cents! It only has 2 pieces and 4 seams, and there's nothing much crazier than knits and purls.
You guys, I'm scared of cables, but at the same time I am totally infatuated with cabled sweater patterns. Somebody teach me! (I want to make this Severus pullover so bad in that awesome jade green colorway. And also Neville's sweater when I learn colorwork. My knitting eyes are obviously way bigger than my stomach. Also Harry Potter, ahh!)
I had this pound of love acrylic yarn in this minty green, and I figured this was the most yardage of anything I have, it'll be perfect for making my first sweater since it might be an unmitigated disaster. I only have one set of needles, and I wanted to use this yarn, so I basically fudged the gauge and called it close enough with stretching. I wanted it to be somewhat tighter than the picture anyways.
I cast on twice as many as the smallest adult size thinking I could match gauge by adding more stitches. But I learned, that's not how you do it, and the piece I started with was not what I thought it was. I basically had the idea that I was knitting from the waist up. I knitted a few rows before I realized something crazy was going on and then I ripped it out and started again.
So when I started, it looked like this (see below). And I was thinking, there's no way this is going to be right. It looks like a uterus. This is after I ripped out the first try. This is actually one of the sides of the sweater, you turn it sideways when you seam it together with the other piece. I actually had started knitting the sleeve flat in this picture.

I also learned that I have freakish hulk arms and that I should probably size up in the sleeve or not decrease so dramatically. The first sleeve I made was according to the pattern and it was comically tight and stretched out on my arm. I debated making another but figured it would be more wearable if I did, so I scrapped the first one.
But here it is after all the trouble! I shamelessly copied Kendi's styling with this mint and navy combo. It's so brilliant together though, right? Totally fresher than mint and black which is what I would have defaulted to.

The jasmine blooms for about a week in the course of an entire year and then all the pretty blossoms promptly turn brown and fall off. I tried to get these pictures in before they all started dying because that bush is pretty marvelous if just for that one week.

I actually nixed the corrugated pattern on the sleeves since I thought they looked kind of frumpy and opted for stockinette all the way down and then used a modified rib knit for the cuff. I thought it would be fun to have a nonstandard cuff so I finally settled on [K1, P1, K1, P3] repeat around the cuff.

I think it ended up a little short (and tight!), so it's more of a cropped sweater.

Totally learned and practiced my JSSBO (Jeny's Surprisingly Stretchy Bind Off) on the cuffs! I made the mistake of using a traditional bind off on the first extremely tight sleeve, and it was all I could do to get it over my hand.

Strappy dresses/tops only under this thing I guess since the neckline is so weird. It's definitely a cool effect though.
I have no idea how much yardage I ended up using, but there is still a comically large ball of yarn left even though I was convinced I was going to use up much more than I did.
Not bad for my first try, eh? I still have yet to wear this out anywhere (do I dare?) but it's been quite hot, so that's my excuse. I actually have a second sweater in the works right now, and it's already looking much better than this one!
Wednesday, July 16, 2014
Crochetvies
Monday, July 14, 2014
A little bit of crafting, a lot of sewing, and no blogging
My apologies to anyone still out there.. sorry I've been so lackluster around these parts!
But it's hard work keeping up the blog. For the most part, I've been doing a lot of uninteresting things, with the exception of a few big events. However, it's hard to set aside time to put together a blog post when that time could be spentfrustratingly enjoyably sewing. Plus, I'm a little camera shy, and a lot of my recent makes involve me gussying myself up and preening for the camera (in a preferably picturesque locale). You can see why I don't do this.
Funnily enough, my friend just posted about blogging procrastination. It's a much funnier version of what this post essentially says (TL;DR Sorry I suck at blogging). Go check it out, she's a very funny lady.
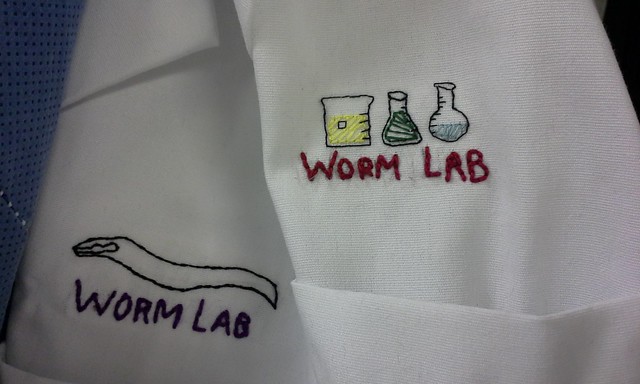
I thought I would just share this little phone snapshot of a bit of embroidery work that I did on some lab coats for work. The university provides us with lab coats with personalized embroidery but there's a turn around time of at least 6 weeks. And it didn't work out with a student worker, so we got these two with his name even though he'd been long gone. I took the liberty of unpicking/cutting off the embroidery and going over it with a little bit of hand embroidery of my own to hide the many pin holes left behind by the previous name.

I'm hoping to up my blogging game in the coming months since I'm going to try and do Sally's summer stash-bust challenge. I've already technically finished a piece after June 21, but sadly I have no pictures to do it justice. So, I'm just going to have to suck it up and go out there dressed to the nines to pose for a self timer. Blogging is weird, right?
Incidentally, you may still yet see some interesting side projects that I have been working on (cloth napkins! wood burning!)
Is blogging about your life weird when you don't do much? Or maybe it takes a certain kind of person to like blogging? Anyone else out there with me on this?
But it's hard work keeping up the blog. For the most part, I've been doing a lot of uninteresting things, with the exception of a few big events. However, it's hard to set aside time to put together a blog post when that time could be spent
Funnily enough, my friend just posted about blogging procrastination. It's a much funnier version of what this post essentially says (TL;DR Sorry I suck at blogging). Go check it out, she's a very funny lady.
I thought I would just share this little phone snapshot of a bit of embroidery work that I did on some lab coats for work. The university provides us with lab coats with personalized embroidery but there's a turn around time of at least 6 weeks. And it didn't work out with a student worker, so we got these two with his name even though he'd been long gone. I took the liberty of unpicking/cutting off the embroidery and going over it with a little bit of hand embroidery of my own to hide the many pin holes left behind by the previous name.

I'm hoping to up my blogging game in the coming months since I'm going to try and do Sally's summer stash-bust challenge. I've already technically finished a piece after June 21, but sadly I have no pictures to do it justice. So, I'm just going to have to suck it up and go out there dressed to the nines to pose for a self timer. Blogging is weird, right?
Incidentally, you may still yet see some interesting side projects that I have been working on (cloth napkins! wood burning!)
Is blogging about your life weird when you don't do much? Or maybe it takes a certain kind of person to like blogging? Anyone else out there with me on this?
Subscribe to:
Posts (Atom)